Raising and Monitoring Signals Example Workflow
This example will guide you through the steps of raising and monitoring signals within a single flow chart using the Flux GUI. Signals are the mechanisms used to set up dependencies and correspondence between actions in a single flow chart. With this feature, you can notify actions that a certain path in the flow chart has been followed, or that an error has occurred.
In this example, you will set up a flow chart with a File Modified Trigger that searches for files changed in a certain directory. When a file is changed the change will inform an action to take the proper measures. For this example, the File Modified Trigger will fire which raises a signal that is then received by a Delay Trigger. Once the signal is received the Delay Trigger will flow down the specified signal flow.
This example also demonstrates the behavior of signals. When an action receives a signal, the action needs to finish what it is doing before flowing down its signal flow.
Viewing the Example Files
Your Flux installation includes a working, pre-constructed version of this example. To load the example file:
- Click the “Repository” tab.
- Click the “Import” button.

In the dialog that appears, browse to <Flux Home>/examples/end_users/signals, and select the .ffc file located there.
When the workflow finishes uploading, select it from the grid to view the workflow in the Designer. If you wish to create this example from scratch, the instructions are below.
Navigating to the Designer
In this section, we will explain how to create the example described above. The Flux Designer will be used to create and execute the example workflow. Navigate to the Designer tab by clicking on “Designer” on the top bar of the UI.

Creating Actions
When you visit the Designer, you’ll see a blank workspace representing the new workflow. To create the example, we’ll start by populating the workflow with a few actions.
To add an action to the workflow, left-click the action and drag it onto the Designer workspace to add it to the workflow.
The following table contains the type, category, and quantity of each trigger and action we’ll use in this example.
| Action Type | Category | Quantity |
|---|---|---|
| File Modified Trigger | File | 1 |
| Delay Trigger | Core | 3 |
| Console Action | Core | 5 |
Setting up Flows
Using the image below as a guide, create flows between the actions. To create a flow:
-
Hover your mouse over the action your with to draw from. You will see a set of 4 blue arrows appear around the action.
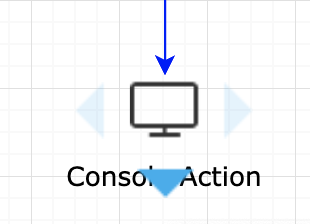
- Click and hold the left mouse button on the blue arrow you wish to draw the flow from.
- Drag your cursor to the action you wish to draw the flow to and release.
Editing the Action Properties
Delay Triggers
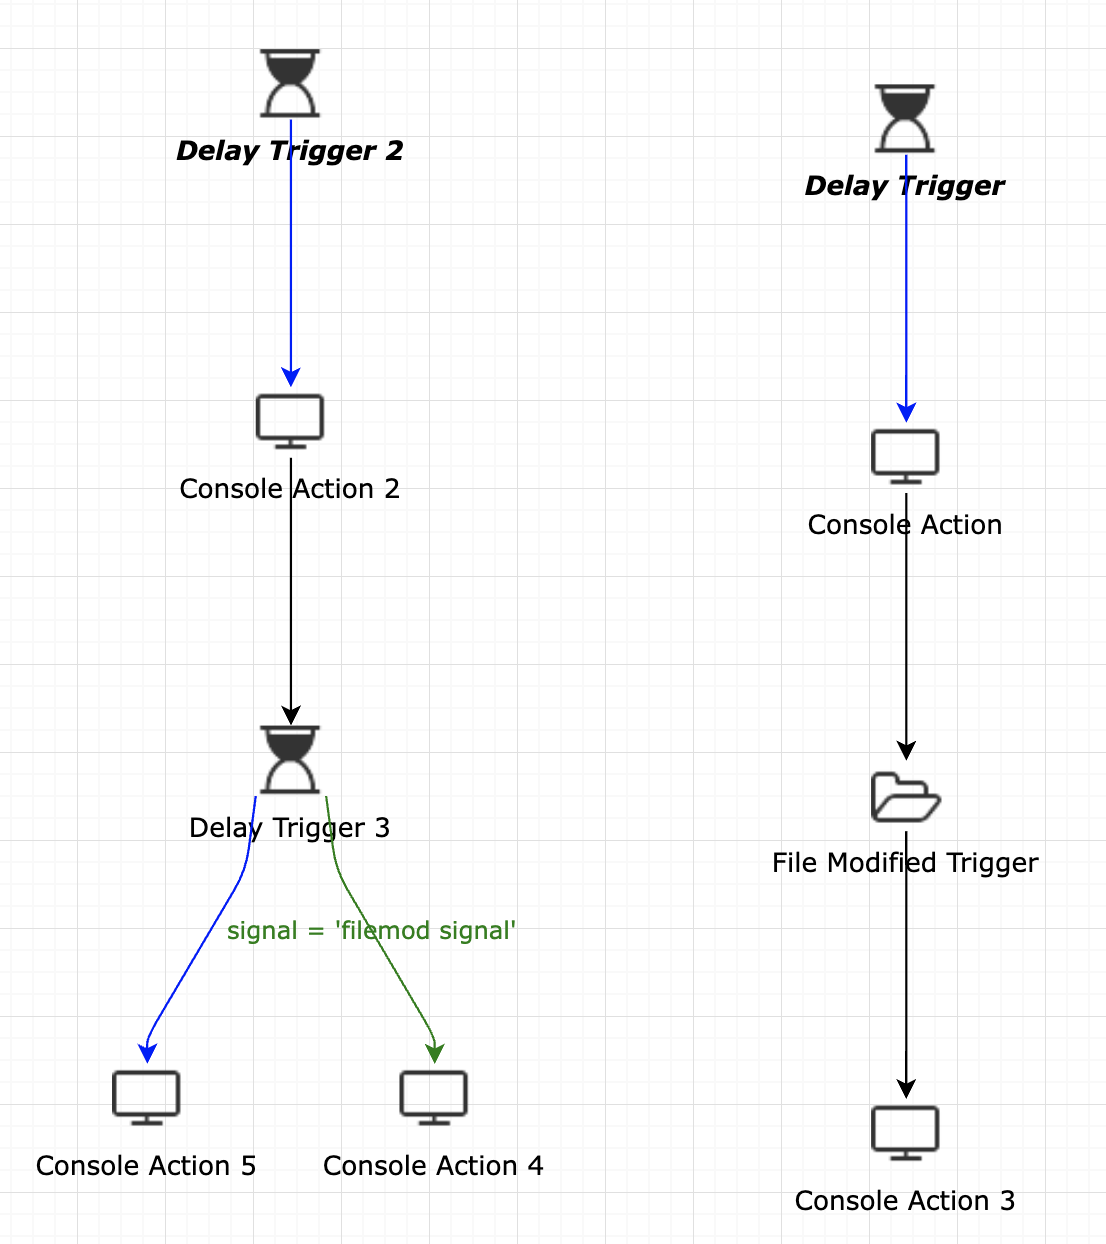
Now we need to set both “Delay Trigger” and “Delay Trigger 2” to be start actions. Start by double-clicking on the trigger labeled “Delay Trigger”. Click on the option “Start Action” in the menu that appears. Do the same for “Delay Trigger 2”. You should now have two Delay Triggers as start actions.
Next, make sure no other actions within your flow chart besides “Delay Trigger” and “Delay Trigger 2” are start actions. If there are other start actions then use the steps above to deselect the start action check boxes.
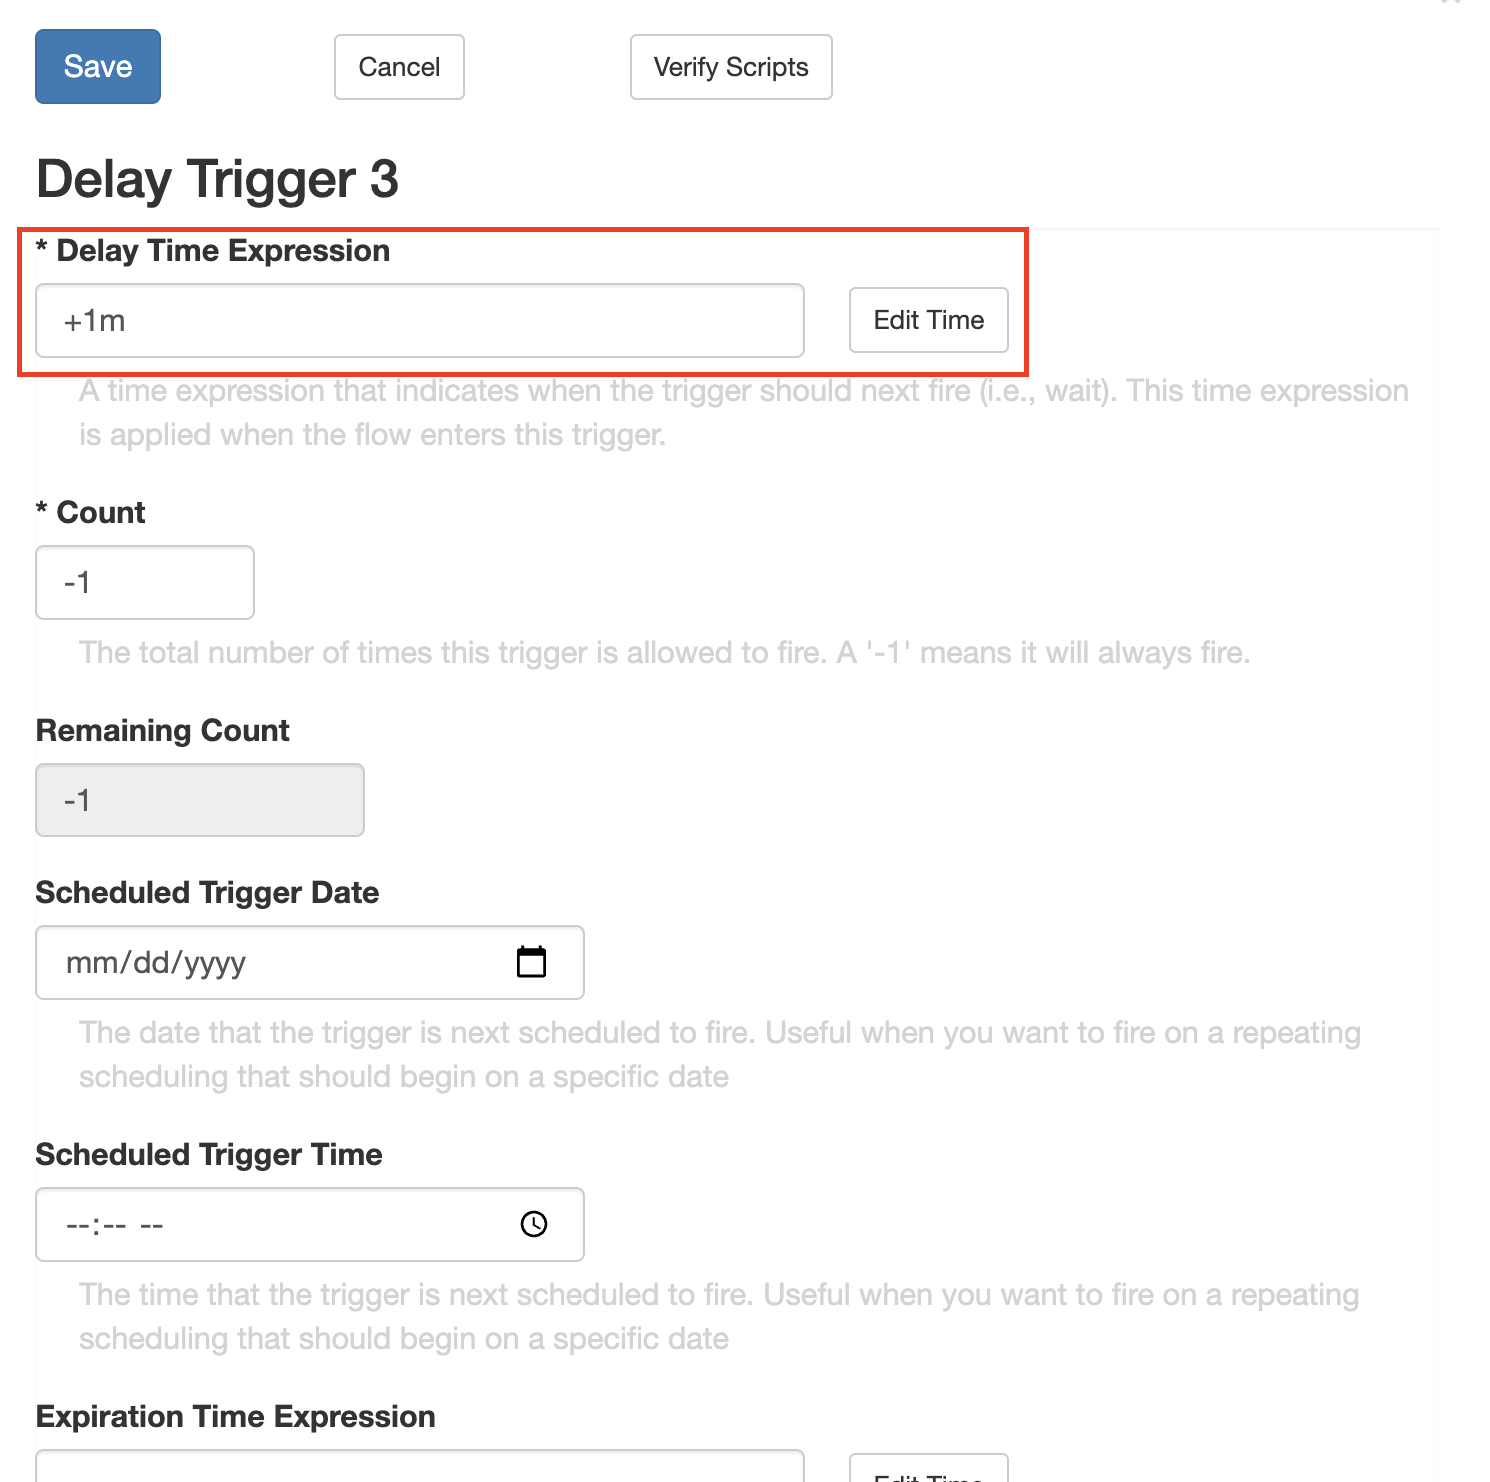
Now, double-click on the trigger labeled “Delay Trigger”. Edit the “Delay Time Expression” field value to be “+4s”. This gives the trigger a delay time of four seconds before firing.
Do the same for “Delay Trigger 2” and “Delay Trigger 3” except set “Delay Trigger 2” with a delay time expression of “+2s” and “Delay Trigger 3” with a delay time expression of “+1m”. See figure below for a reference.
Console Actions
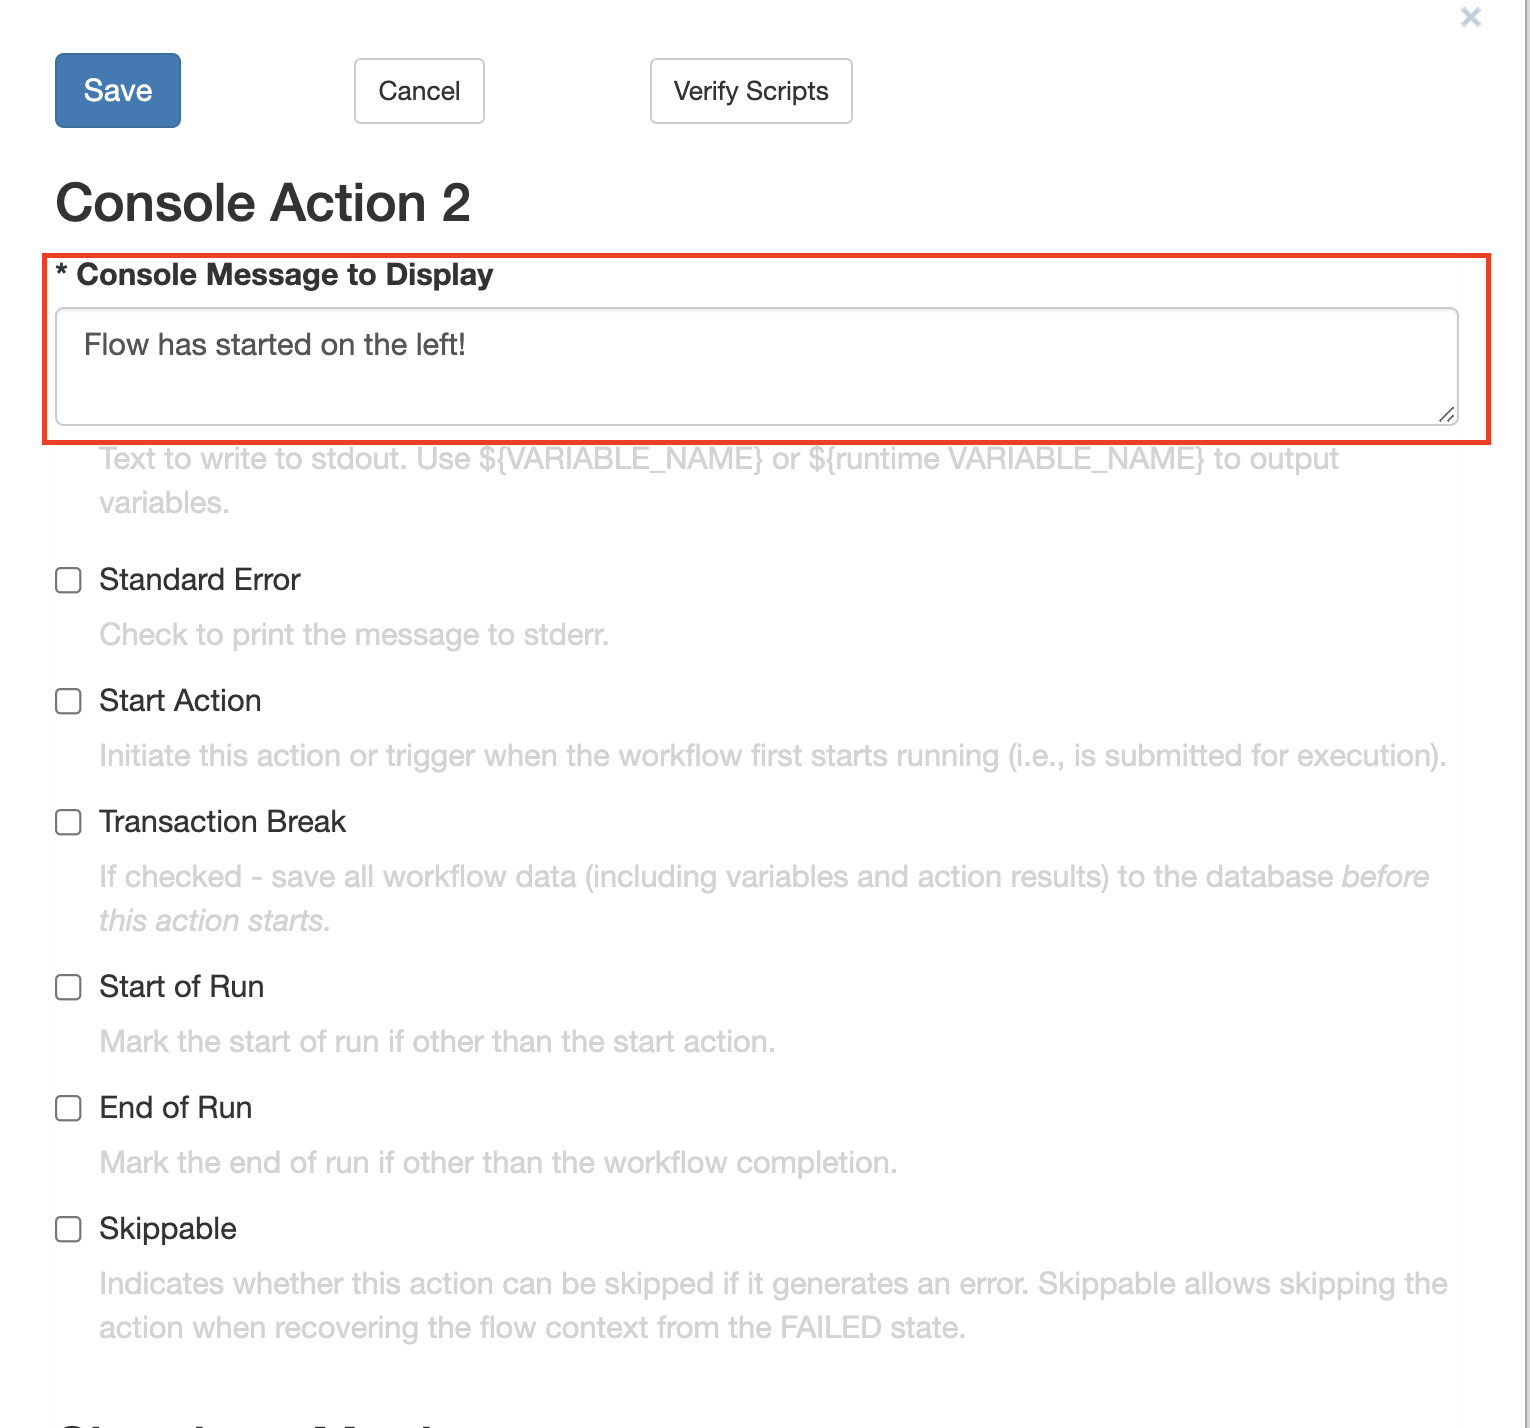
Double-Click your Console Action named “Console Action”, which should be directly under your “Delay Trigger”. Edit the “Console Message to Display” field to say: “The flow has started on the right!”.
Do the same for “Console Action 2” except have it read: “Flow has started on the left!”. Use the figure below as a reference.
Add messages to the remaining Console Actions. Let’s start with the Console Action the File Modified Trigger flows into, “Console Action 3”. Type the String, “The File Modified Trigger has fired!” into its “Console Message to Display” field.
Next, click on the Console Action to the left of “Delay Trigger 3”. Edit its message to read: “Regular work has started”.
Finally, edit the Console Action to the right of “Delay Trigger 3”, the signal action. Edit this Console Action’s “Message” field to read: “Signal flow has been followed!”.
File Modified Trigger
Next, double-click on the “File Modified Trigger”. Click on the “+ Source” button under the File Sources heading. Then, from the “Source” drop-down menu, select Local Host. Then click the “+Include” button under the Includes heading. Copy the settings seen in the screenshot below.
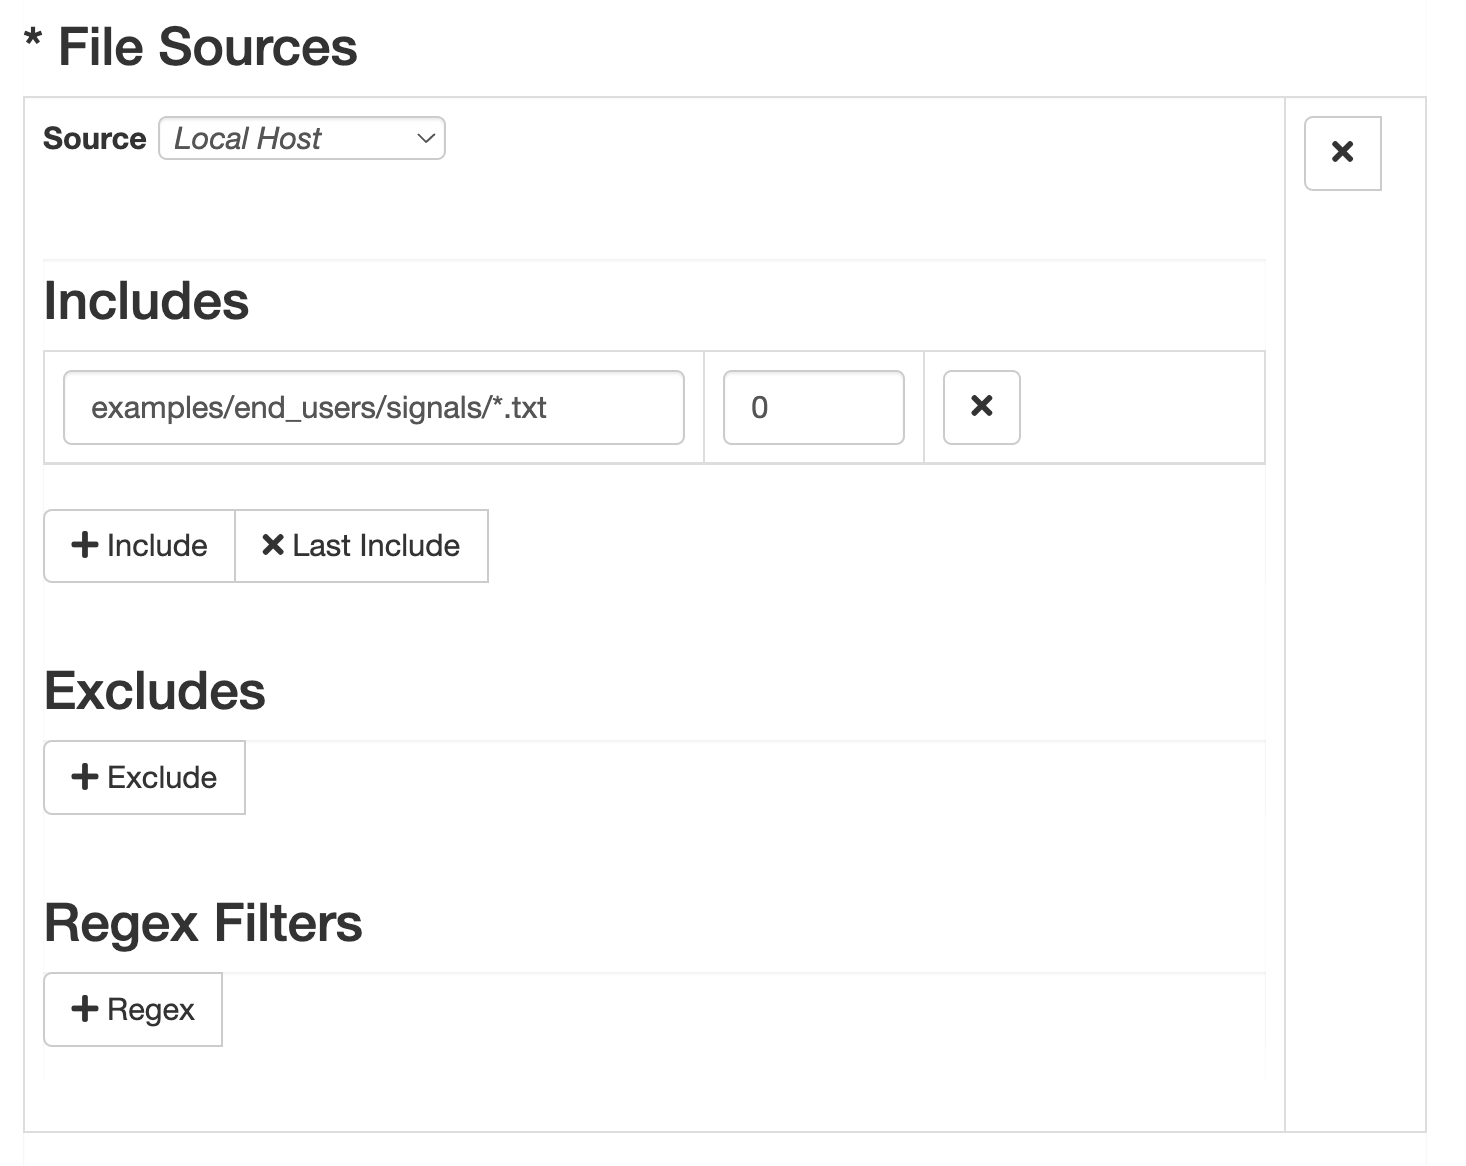
Because our path ends with “*.txt”, this will tell the File Modified Trigger to search for any files that are of type “.txt”, or text files.
Lastly, set the File Modified Trigger’s “Stable Period” and “Polling delay” to “+1s”. This will ensure the file is stable before the trigger fires.
Setting up Signals
Raising a Signal
You should now be back at the main Flux GUI screen. We need to now set up a signal to be raised if the File Modified Trigger fires.
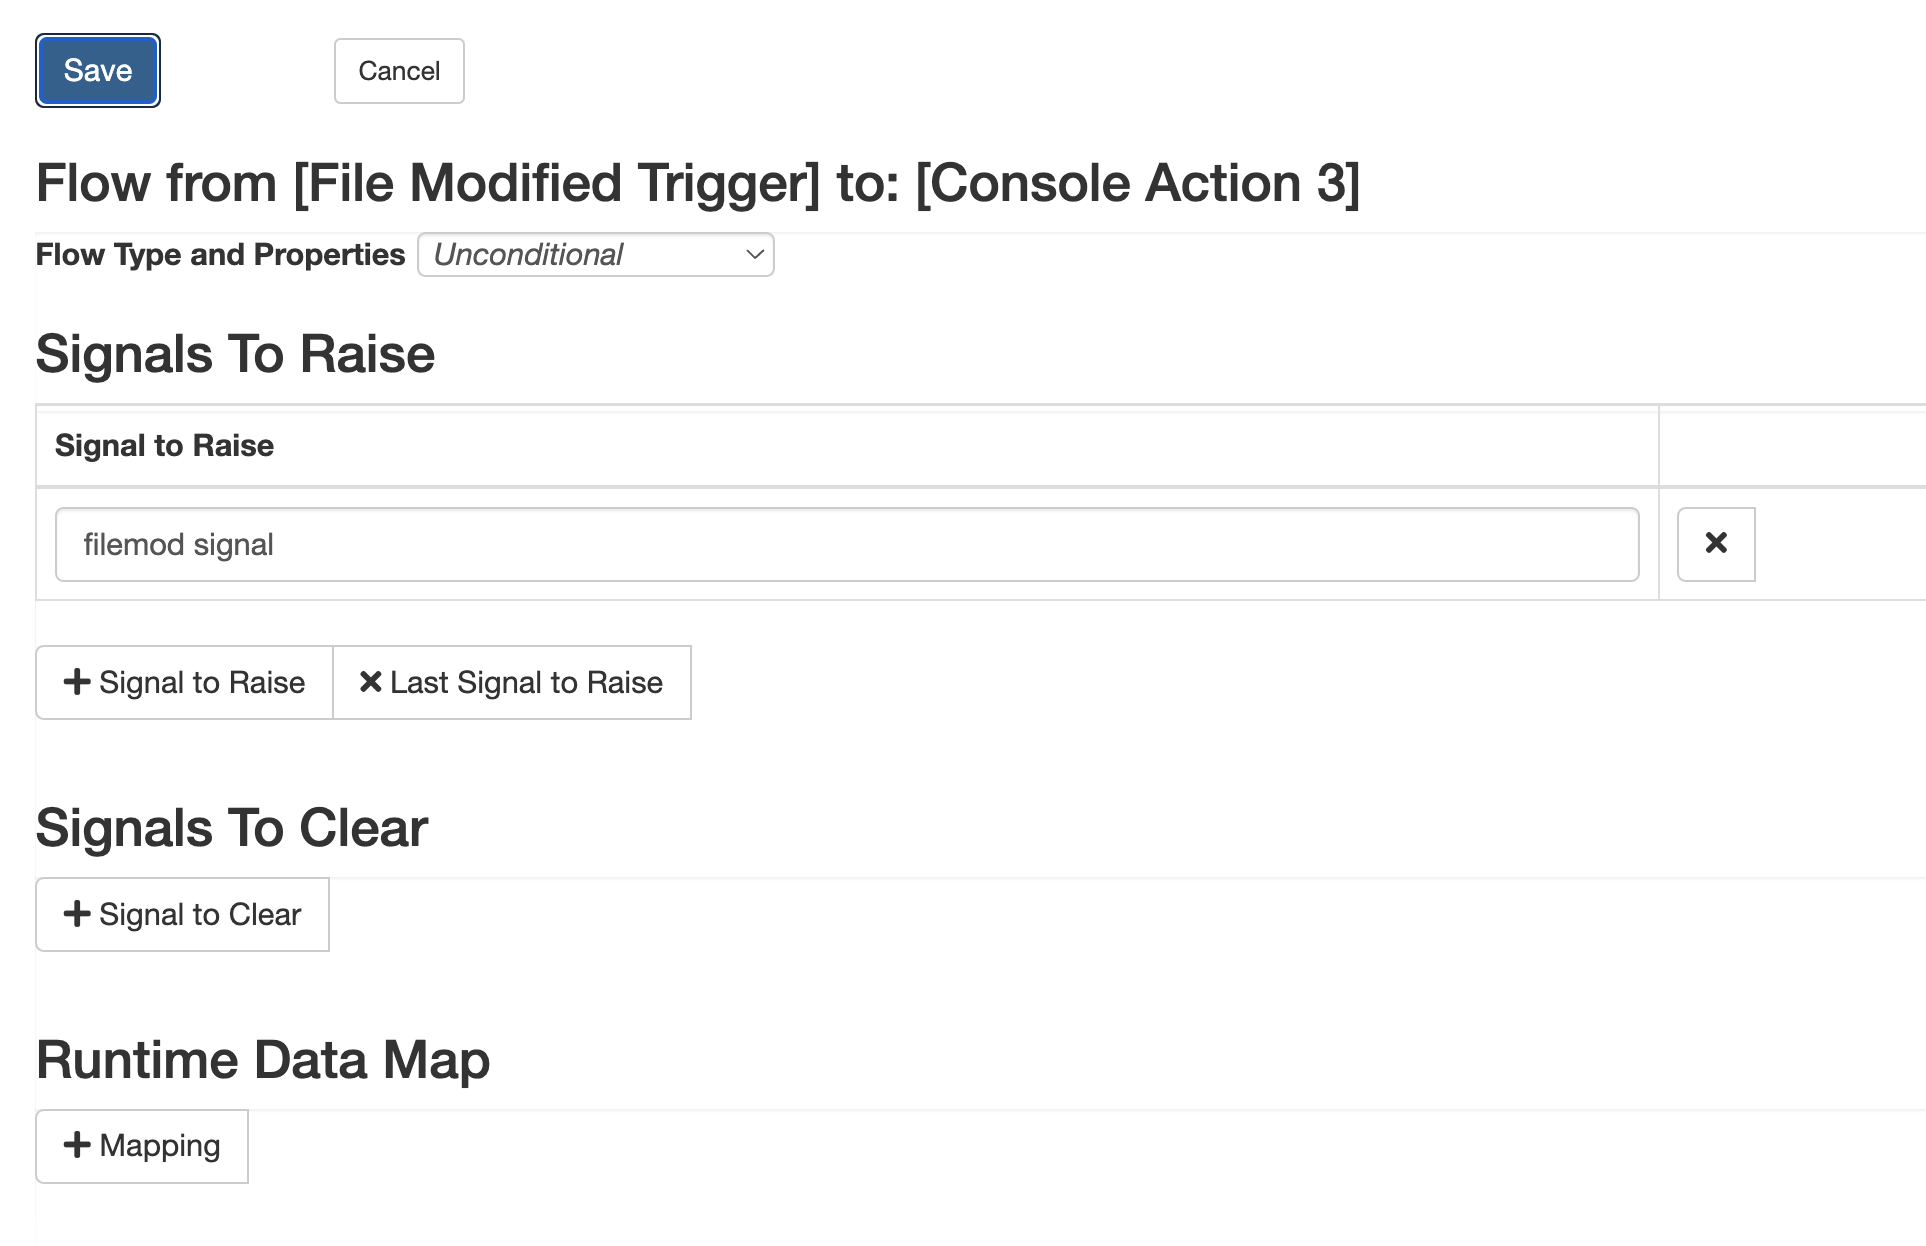
Do this step by, first, double-click on the flow located between your File Modified Trigger and the Console Action it is flowing to.
Next, click the “+ Signal to Raise” button under the “Signals To Raise” heading.
You will now see a blank text box in the middle of the window. Type “filemod signal” into the text box, then click the “SAVE” button.
Monitoring for a Signal
Now we can set up the Delay Trigger to monitor for a signal.
First, double-click on “Delay Trigger 3”, within your drawing canvas, and scroll down to the “Signals to Monitor” section. Click on the “+Signal To Monitor” button. Type the name of the signal we created above into the text box, “filemod signal”.
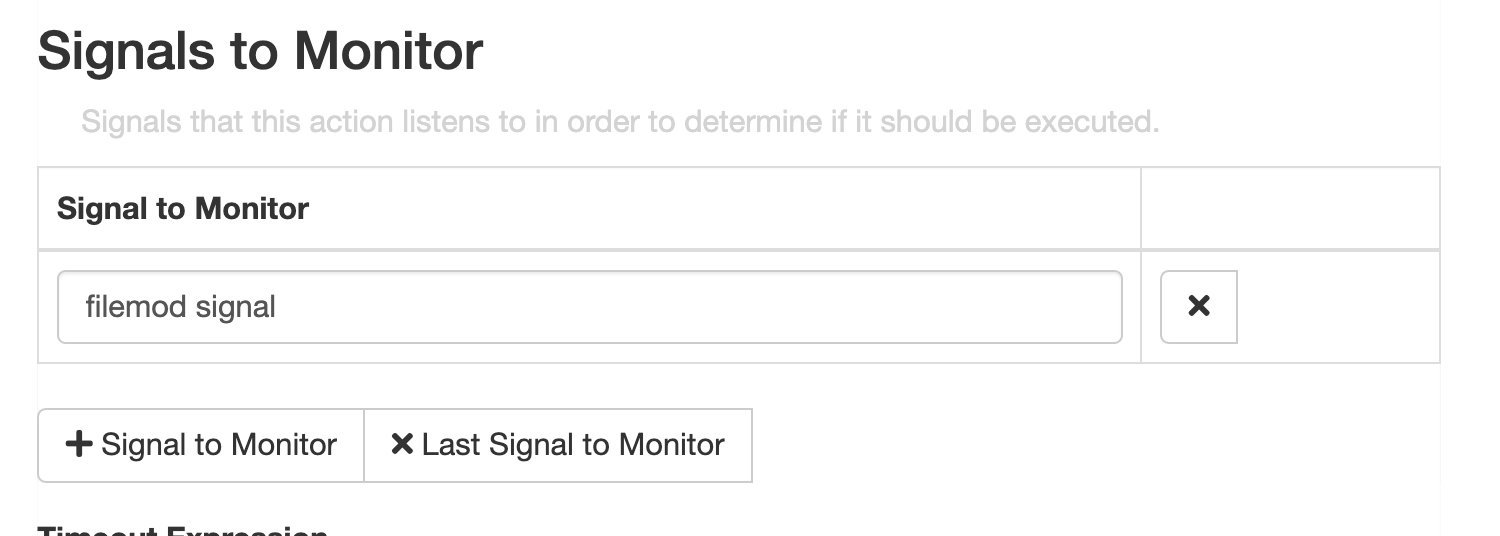
Once you have your signal, click the “SAVE” button at the top of the window. You should now be back at the designer canvas.
Setting up a Signal Flow
Next, we need to specify a signal flow that will be followed if the signal is received. Double-Click on the flow to the right of your “Delay Trigger 3” that flows into “Console Action 4” and a dialog window will appear with the flow settings. Edit the “Flow Type and Properties” setting to be “Signal” and in the text box that appears, type signal = ‘filemod signal’. Use the screenshot below as a guide.
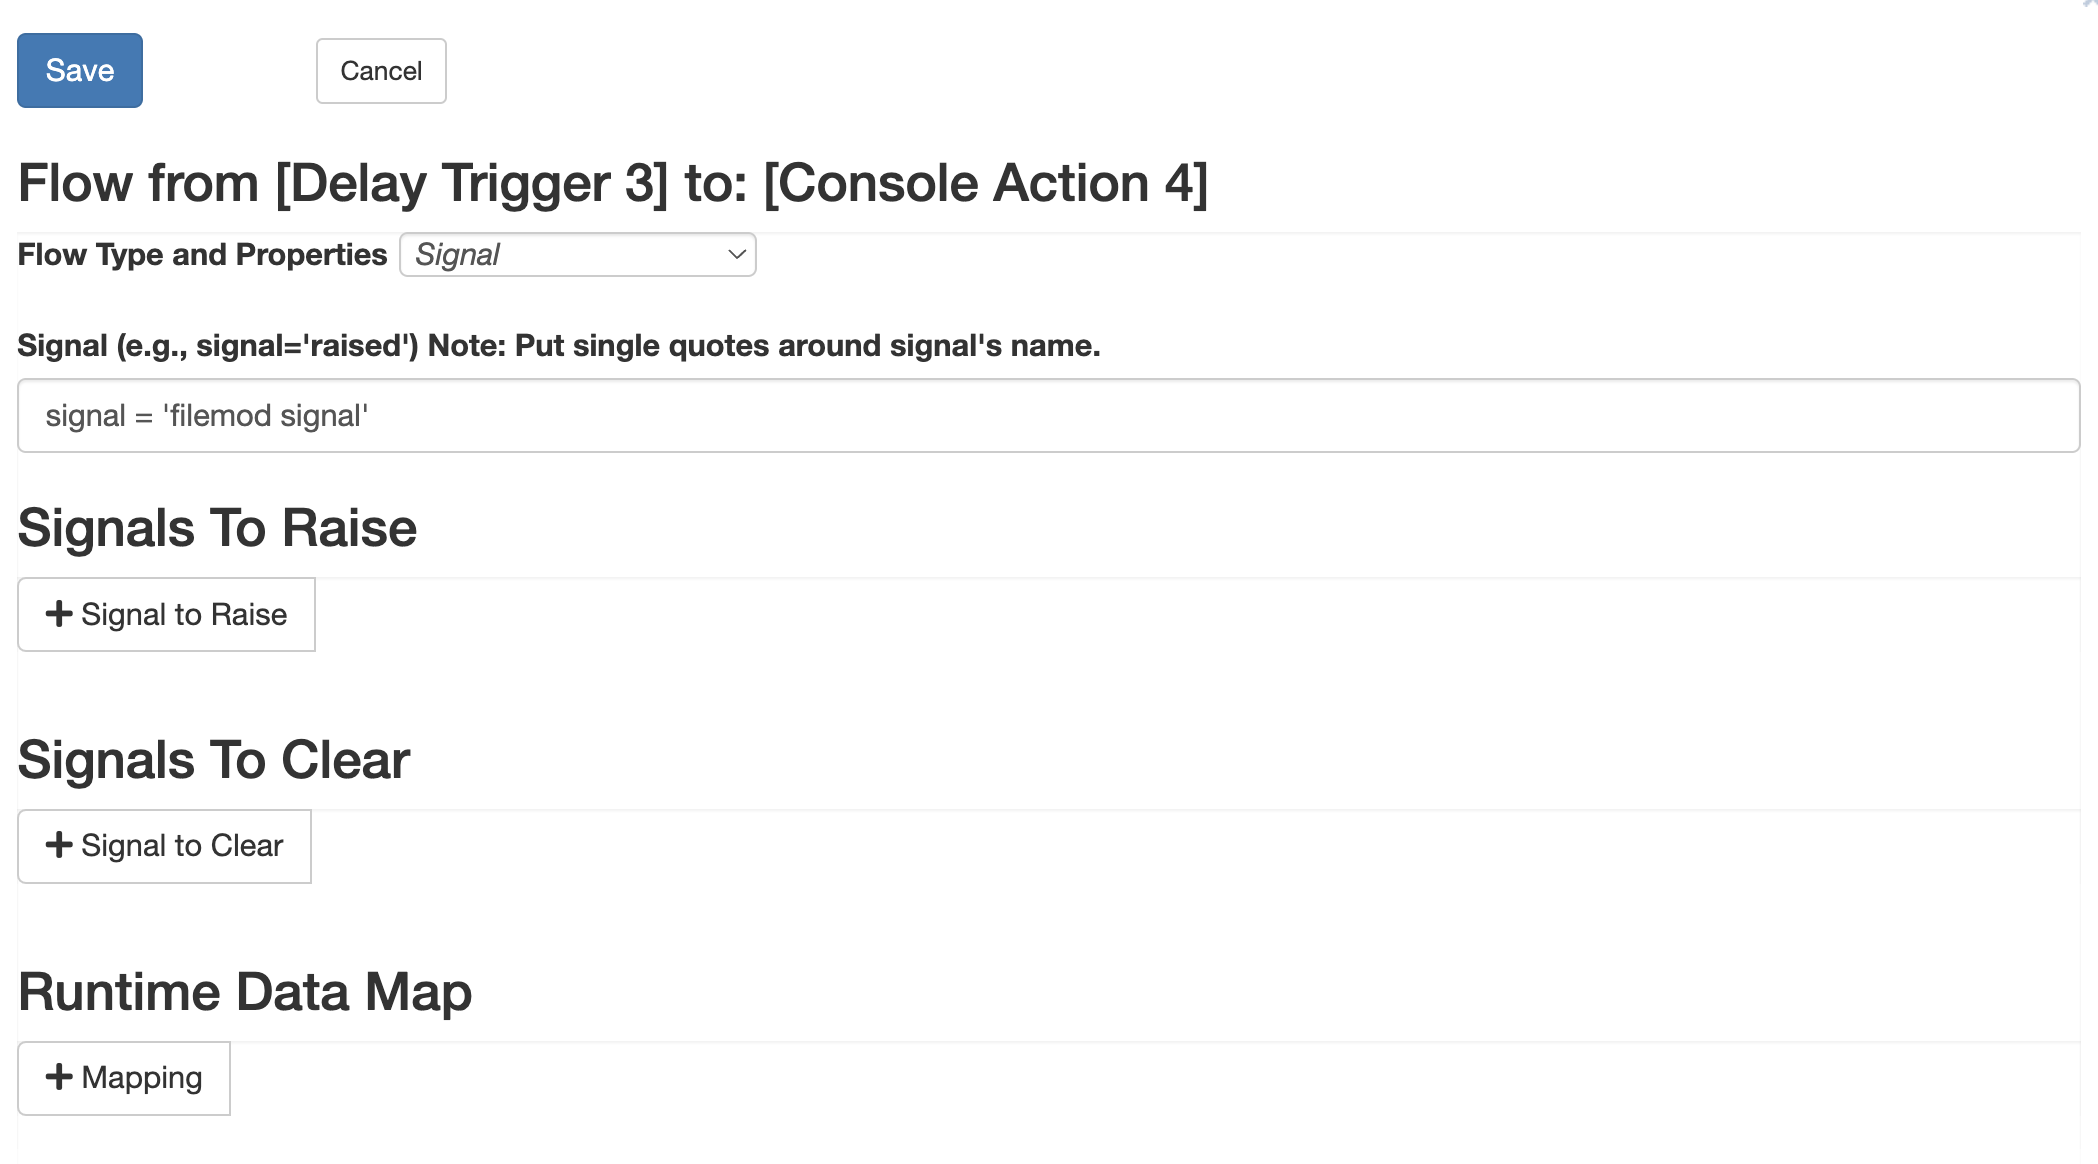
You can now click “Save”. You should now be back at the Flux designer canvas. Your flow chart should look similar to the screenshot below.
You should now have a working flow chart that uses a File Modified Trigger to watch for files in a specific directory. Once a file in that directory is changed it will send a signal to the Delay Trigger to flow into a specified action.
Running the Flow Chart
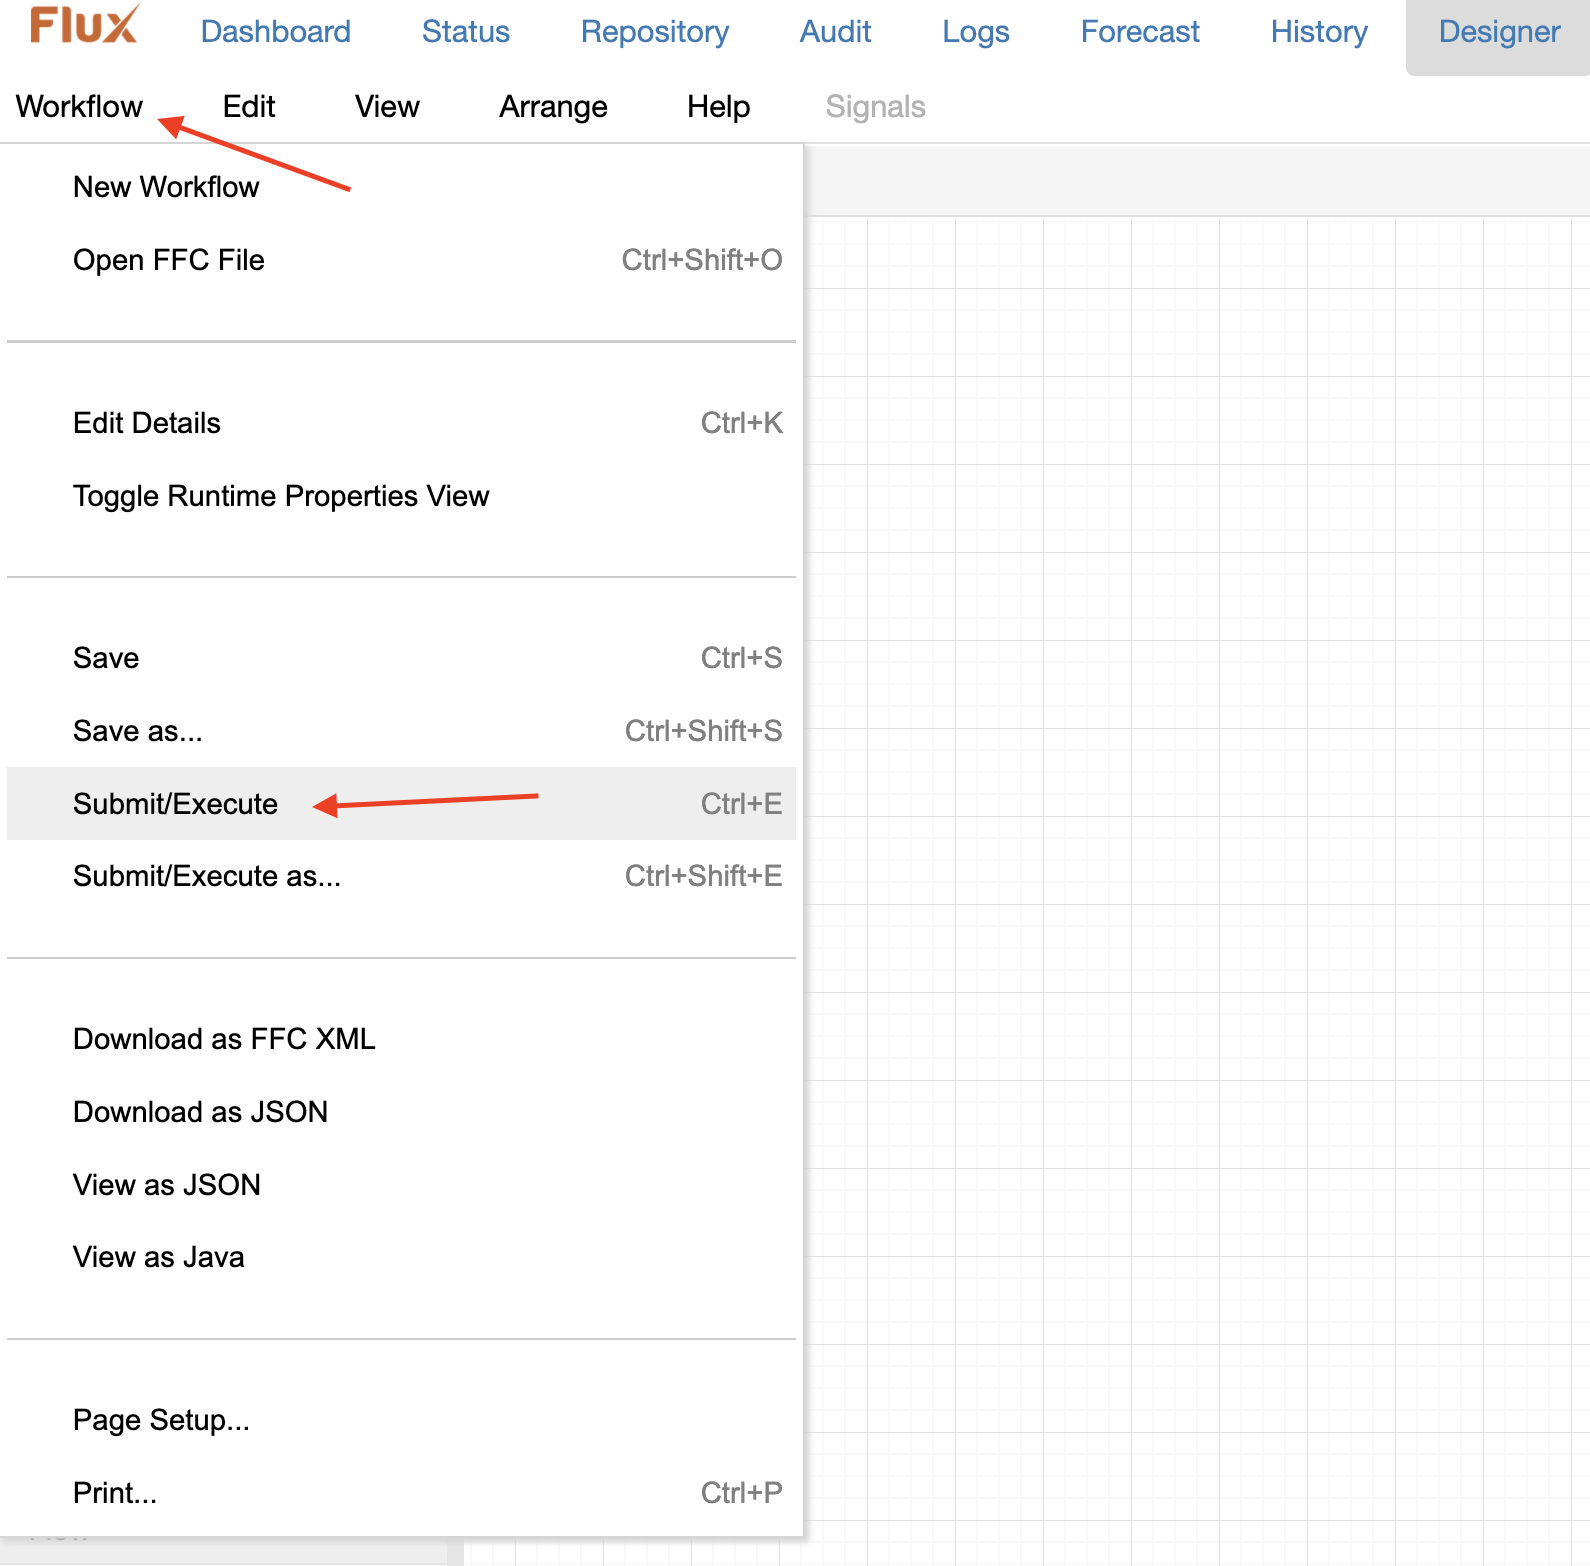
Next, export your flow chart to the engine. This can be accomplished by hovering over the “Workflow” tab near the top left of the screen, then selecting the “Submit/Execute” option. You can also use the keyboard shortcut, Ctrl+E.
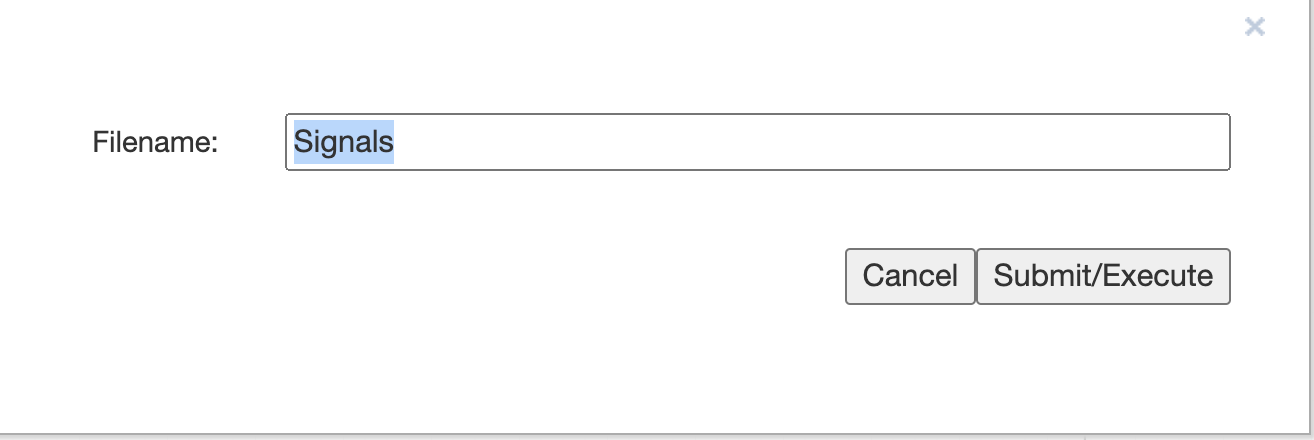
If everything is correct with your workflow, a window will then open asking what namespace you would like your workflow to execute in. You can enter any name you would like, but I have entered “Signals” for this example. When you are ready, click the “Submit/Execute” button to submit your workflow to the engine for execution.
Your job should now be running. If you look at the command prompt you are running the engine from, it should read: “Flow has started on the left!” and “Flow has started on the right!”.
For this example to demonstrate the use of signals, you need to open up the “File to be Modified.txt” file located within this example’s directory. Once you have this file open, type something into the body of the document. Now, close the document and say “yes” when prompted to save the changes to the document. When you have done this the File Modified Trigger will detect that the file has been changed and fire, sending a signal to the Delay Trigger. This Delay Trigger waits one minute for a signal to be sent, before moving on. If it receives the signal it will flow into its specified flow.
Once this example is completed, shut down the engine by running the shutdown-engine script from the Flux installation directory.