Parallelism and Complex Dependencies with Splits and Joints
Sometimes, your workflows will require complex dependencies. An action might need to wait for many different events to occur before it can fire — for example, you might need to wait for one file copy to complete and wait for a flag to appear in the database before continuing in a workflow.
In these cases, complex dependencies are defined using joins — also known as join points.
You might also need to run several tasks in parallel. One way this parallelism is accomplished is using splits — points where a single flow of execution branches into multiple paths at once.
Parallelism
Parallelism occurs whenever two or more tasks execute at the same time. This can be accomplished in two ways: using multiple start actions (so the workflow begins in multiple places simultaneously), or using a split within the workflow.
NOTE: Each concurrent execution branch within a workflow counts against the engine’s concurrency throttle. If there are two branches in a workflow executing in parallel, that workflow will consume two places in the concurrency throttle. Make sure to adjust your throttles appropriately when using parallelism.
Multiple Start Actions
A start action is an action that begins running as soon as the workflow starts (or, in the case of a trigger, begins polling when the workflow starts). If multiple actions are configured as start actions in the workflow, they will all begin running when the workflow starts.
To configure an action as a start action, just set its start action property to “true”.
Using multiple start actions allows you to create parallel flows immediately at the start of the workflow. You can then use join points later in the workflow to merge the two flows.
Splits
A split doesn’t need to be explicitly defined — it will automatically occur whenever a node follows two or more outgoing flows at once. Flux also provides a convenience node, Split, that makes it easy to visually identify where splits occur in your workflows.
After a split, all of the branched executions will execute in parallel. The active flow context is also cloned to each execution branch; after that point, each branch will own its copy of the flow context, and all flow context changes will remain local to the branch where they occur.
For example, suppose you have a workflow that looks like this:
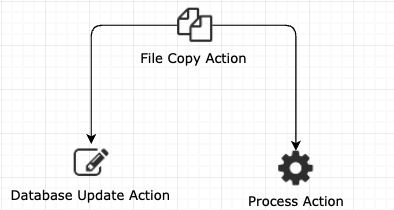
In this case, the workflow begins with the file copy action, which will start a new flow context.
The file copy action then branches into two flows, to the database update action and the process action. This will create two new, unique flow contexts. Also, these will each retain the information from the initial flow context, allowing both nodes to access result information from the file copy, they are now independent and do not impact one other.
Complex Dependencies
When you use parallelism, you’ll often want to merge or join your execution branches at a certain point. This allows you not only to combine multiple execution branches but also to define complex dependencies — triggers or actions that wait for a set of requirements to complete before executing.
For example, you might have an action that needs to wait for a file to appear on an FTP server, and it should only execute after 08:00. In this case, you’d execute a timer trigger and file exist trigger in parallel, then merge their outgoing flows back at a single point where the action will execute.
To perform this synchronization and merging, you must do two things: each flow must arrive at a single node, and the node must have the “join point” property enabled, to specify that the action should wait for all incoming flows before firing.
When multiple flows merge in a complex dependency, a new flow context is created, and any flow context information from the incoming flows is removed. If you need to access flow context data after the join, be sure to save it into a new flow chart variable before the join occurs.
Join Points
When you enable the join point property on an action, you instruct the action that it must wait for all incoming flows (or some combination of flows - see below) before it can execute.
If an action does not have have the join point property enabled, then each incoming flow will cause the action to execute again as the flow enters. This can cause an action — and all subsequent steps — to be executed several times unintentionally.
Any action with the join point property enabled automatically becomes a join point. Flux also provides a convenience action, Join, that makes it easier to visually identify where joins occur in your workflow.
Conditional Join
A conditional join is a specialized join point that only needs to wait for a combination of flows to arrive, rather than waiting for all incoming flows. This is useful when you have several flows entering a join point, but you only need some of them to finish before continuing.
You can create a conditional join by setting the “join expression” on any action. The join expression is the expression that specifies what combination of incoming flows will allow the join point to execute.
If you add a join expression, you don’t need to set the join point property — any action with a join expression is automatically a join point.
Once the join condition is satisfied, the join point will fire. Any incoming flows after that point will be terminated once they arrive at the join.
Suppose, for example, that you have a workflow with three actions running in parallel — “A”, “B”, and “C”. These actions all flow into a single action, “D”. D can execute if both A and B finish successfully, but if C completes successfully then D can fire immediately without waiting for A and B. In this case, you could set the join expression:
A and B or C
This join expression tells D “fire if the incoming flows from both A and B arrive, or if the incoming flow from C arrives, whichever occurs first”.
Join Expressions
As we’ve seen, the join expression specifies the combinations of incoming flows that allow the join point to fire. Join expressions aren’t case sensitive — feel free to use whatever casing convention makes sense for you.
There are three operators you can use in a join:
- and
- or
- not
There also two types of objects you can compare in your expression:
- action names
- numbers
Action names are the names of incoming actions (actions that flow into the join point). The following table demonstrates how to use action names to specify the incoming flows that should allow the join point to fire (where “A” and “B” are the names of incoming actions):
| Operator | < Name > | Example Description |
|---|---|---|
| or | A or B | Fire if either A or B flows into the join point. |
| and | A and B | Fire if both A and B flow into the join point. |
| not | not A | Fire if any action other than A flow into the join point. |
Numbers, on the other hand, specify a count of how many flows should arrive before the join point executes. For example, this join expression:
3
Will cause the join point to execute if three incoming flows arrive.
Numbers are always evaluated as less than or equal to the number of incoming flows - the join expression above will fire if four incoming flows arrive, but not if only two flows arrive.
Conditional Joins in a Looping Workflow
When your workflow encounters a conditional join, the first flow that arrives at the join will “register” itself with the join point, supplying its own ID as well as the IDs of each additional flow that’s expected to arrive. The join is “cleared” when one of two conditions occurs:
- All of the incoming flows, including late-arriving flows, have entered the join.
- One of the flows from the previously registered join that has already fired enters the join again.
In some cases, it might be possible for the join point to fail to clear for the first loop of a flow before the second loop begins. For example, consider the following workflow:
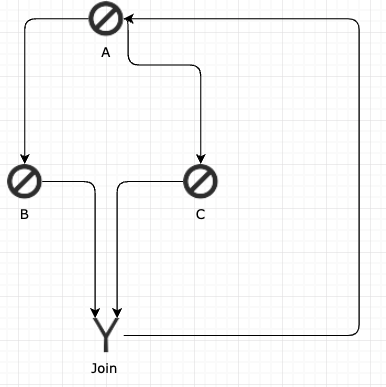
If A returns a result of true, it will flow into C. If it returns a result of false, it will flow into B.
The Join has a condition “B or C”, so it will fire if either flow arrives.
In the first loop of the workflow, A fires and returns a result of true, so it flows into C. C, in turn, flows into the Join, whose condition is satisfied. The join is not cleared, though — it is still waiting for either a flow from B, or a new flow from C to confirm that a new loop has started.
In the second loop, A fires and returns false this time, so B executes. Since the join is still registered, the workflow assumes that this execution of B is from the same conditional join, so the incoming flow is terminated. This was the only active flow in the workflow, so since it is terminated, the workflow is not able to continue running and is removed from the engine.
In this case, the join condition is not necessary at all — since it’s not possible for B and C to reach the join on the same loop, only one flow will ever arrive. The join point can be safely removed to allow the workflow to run as expected.
Using Signals to Stop Unnecessary Flows at Conditional Joins
A conditional join will terminate any incoming flows that arrive at the join point after the condition is satisfied and the join point fires; this won’t, however, stop any actions before the join point from firing. If you have actions that are not necessary to run once the join is satisfied, you can use signals to prevent those actions from firing.
Consider a workflow with a start action “A” that splits into two parallel flows, “B” and “C”. After “B”, there is a series of actions, the last of which, “Y”, flows into a conditional join point, “Z”. C flows directly into the join point Z.
The join point Z can fire if either Y or C arrives, so it has the join point “Y or C”.
Now, suppose that C completes before B, and it’s no longer necessary to execute any of the actions between B and Y. In this case, the best approach is to have each of the actions between B and Y monitor for a signal (we’ll call the signal “STOP”).
You can raise the “STOP” signal on the flow coming out of the join point Z. When the join point fires, this signal will be raised. Any action monitoring for the “STOP” signal will then be prevented from executing.
This scenario, known in Flux as the “abort” scenario, allows you to keep Flux from wasting processing time and power by preventing actions that aren’t required. A working example of the abort scenario is available in _
When multiple actions are monitoring for the same signal, you will need to manually clear the signal to prevent looping executions from picking up an old signal. See Coordinating Actions using Signals for more information on this.
Transaction Breaks at Splits and Joins
Splits and joins are always transaction breaks, even when the transaction break property is not explicitly enabled.
On a split, this happens because each new branching flow will receive its own flow context, so the existing flow context must be committed to save its data.
Similarly, for a join, a new flow context must be created, so the incoming transactions need to be committed to save the state of the workflow and save the work performed in each incoming branch.