Security
Security allows you to control which actions certain users can perform on the engine. You can restrict almost every action in Flux – including workflow operations like view, pause, and remove, repository operations like copy and promote, and even what items a user can see in the Operations Console – to provide complete control over what a user can or can’t do.
To enable security on an engine, you just need to set the “Security Enabled” property to true in the engine’s configuration. You can set that directly from the engine configuration editor in the Operations Console, or by setting the following property in your engine configuration file:
SECURITY_ENABLED=true
Once you’ve started the secured engine, clients and users (which might include Operations Console users, Java API calls to the engine, or even scripts or services that are used to start the Flux engine) will need to log in before accessing the engine.
By default, security is not enabled on the engine. However, if you use the engine startup items shipped with flux (including the start-engine script in the Flux installation directory, or using the Windows service that is automatically installed when you install Flux from the .exe), the engine will run with a special configuration included in the Flux installation package that starts the engine with security enabled. This configuration is located at config/engine-config.properties under the Flux installation directory.
Users and Roles
Users
A user is anybody who can log in to and use Flux. By default, only one user exists – the “admin” user, who has complete administrative control over the Flux system. The default username and password for this user are:
Username: admin
Password: admin
To add a new user to Flux, browse to the “Users” page in the Operations Console. You’ll see a grid with a list of all users on the system. Click the “+ Add User” button here to display the Add User dialog:

You’ll need to provide three pieces of information to create a new user:
-
Username: This is the actual username that the user will use to log in to the engine.
-
Password: The password the user will need to supply to log in.
-
Display Name: A friendly name that the Operations Console will display after the user has logged in. The user won’t need to know the display name to log in – it’s only used by the Console after the login is successful.
By itself, though, a user doesn’t have any permissions in Flux. To give the user permission to perform tasks and operations in Flux, you’ll need to assign them to a role. Every user in Flux can belong to one role at a time. A user’s role defines what permissions they will have available in Flux after logging in to the engine.
Click the dropdown menu under the “Role” heading in the Add User dialog to display a list of available roles:
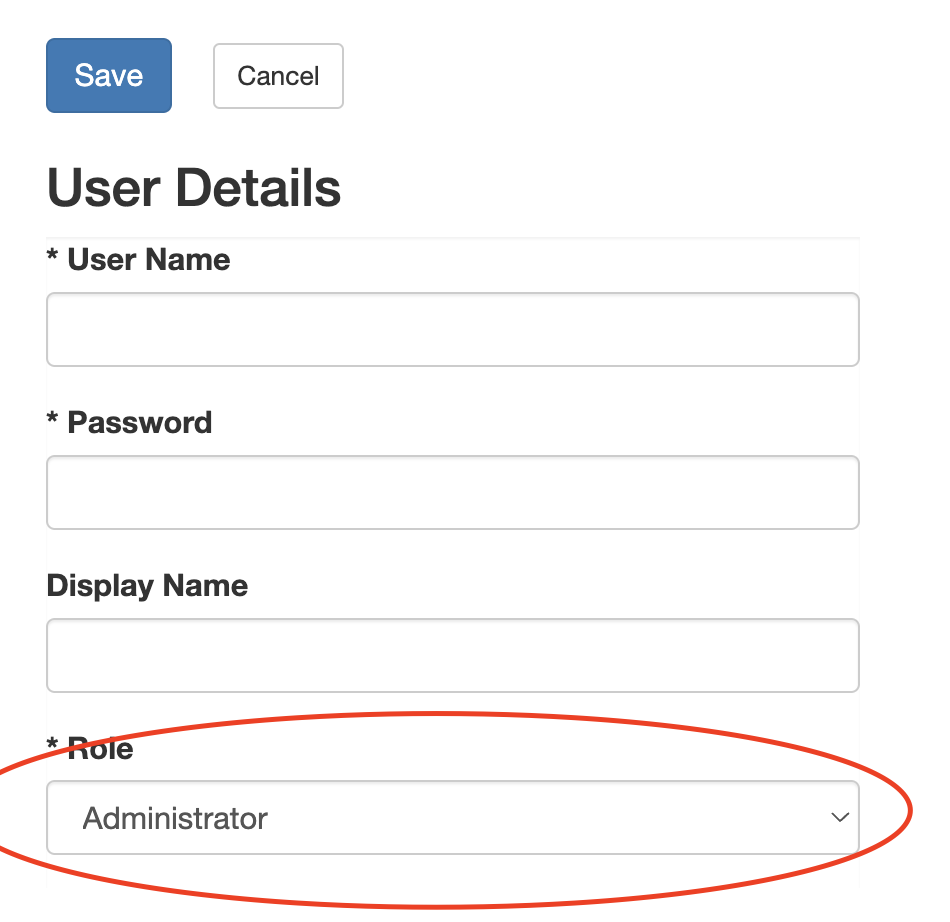
Then select a role for the user and click “Save” to save the user and allow them to log in (see below for more information about roles and permissions).
When you return to the workflows grid, you can add another user, edit any existing user (which will allow you to change their username, password, display name, or role), or remove a user. Note that, to provide a “failsafe” mechanism for security, the default “admin” user cannot be removed. It can be edited, however, to update the default password to a more secure value.
Roles
Roles provide the security restrictions needed to specify what actions users should be allowed to perform on the engine. A role is simply a collection of permissions, which can be assigned to a user to restrict their access to the Flux system.
To view the roles available on the system, browse to the”Roles” page in the Operations Console. The security roles grid will appear.
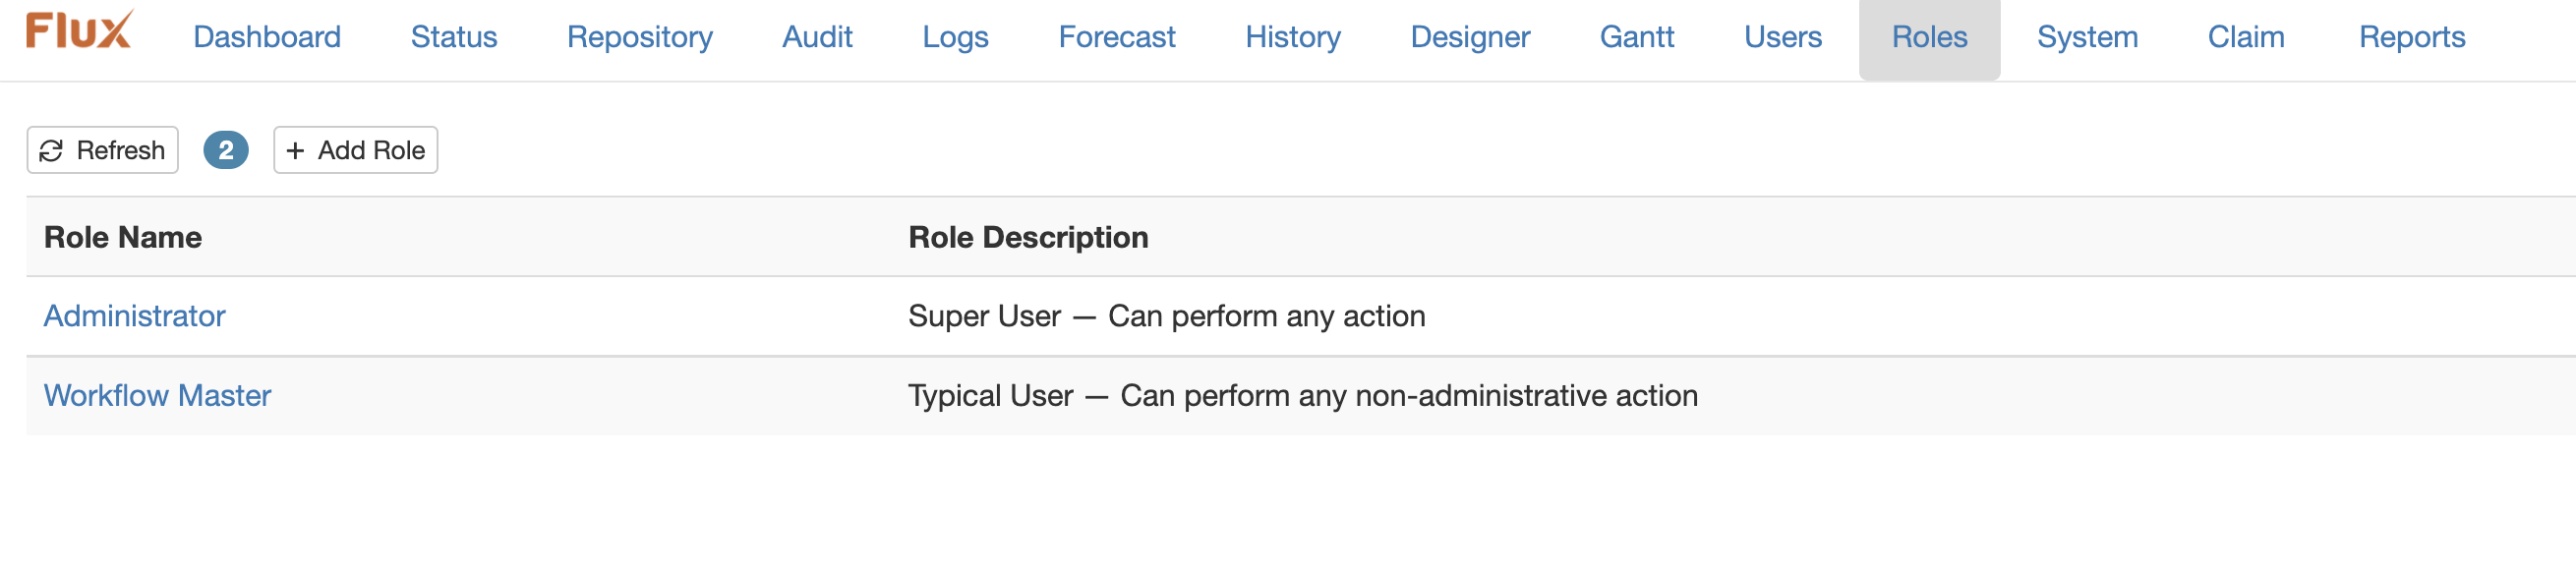
The first time you visit this page, you will notice there are two roles available by default:
-
Administrator: Users with this role can perform any action on the Flux system.
-
workflow Master: Users with this role can perform any non-administrative action (including viewing and operating on all workflows).
These are built-in roles that cannot be deleted or edited, and can be used to quickly set up users with the most common security restriction settings.
If you’d like to customize the security settings for users, you can also create your own roles. To create a role, just click the “+ Add Role” button, which will display the Add Role dialog.
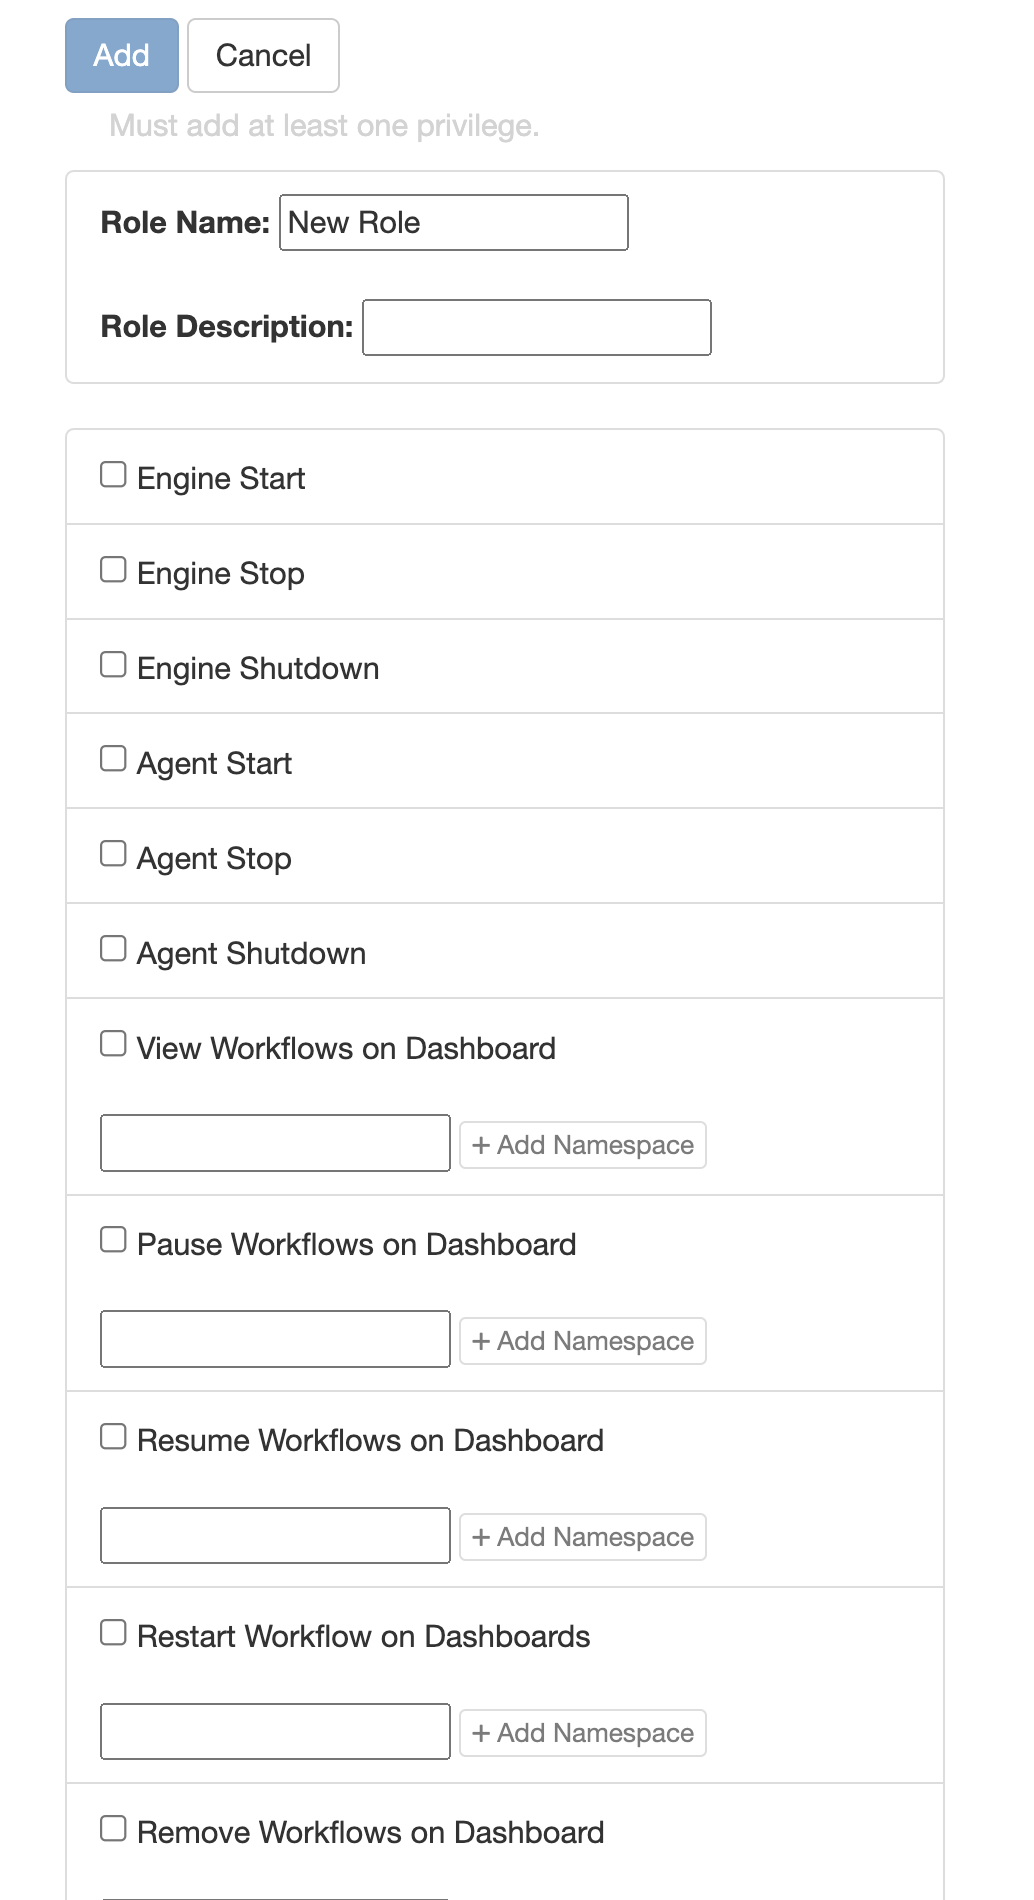
-
Name: The name of the role (used for assigning roles to users).
-
Description: A description of the role, which will appear when a user is viewing available roles on the system (a good description will help users understand the role’s function without having to view the specific permissions available on the role).
These properties must be set in order to save the role when you are finished editing.
These options contain the specific permissions that the user will have on the system (see below for a complete list of permissions). Once you have set up the permissions you want this role to have, click “Add” to save the role.
Once your role is saved, you can apply it to a user (see above for information on setting and editing user roles). A user can only have one role at a time; a role, though, can be assigned to as many users as you need. In other words, there is no restriction on the number of users who can share a particular role.
You can also Edit or Remove a role at any time after creating it. The only roles that cannot be edited are the built-in Administrator and workflow Master roles.
Permissions
The following permissions are available to set when creating or editing a role:
Engines
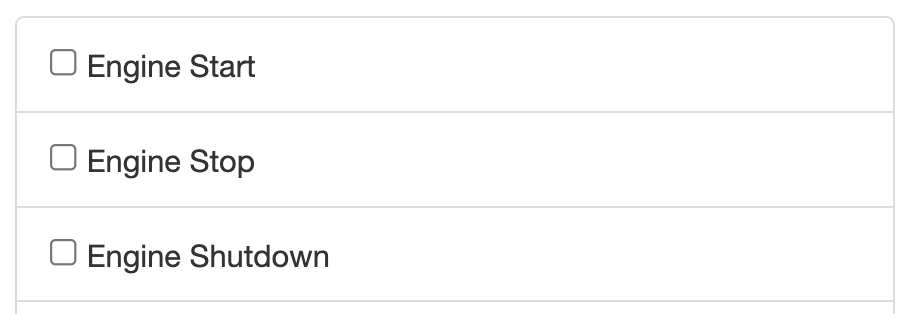
- Engine Start: Allow users with this role to start engines.
- Engine Stop: Allow users with this role to stop engines.
- Engine Shutdown: Allow users with this role to shut down engines.
Agents
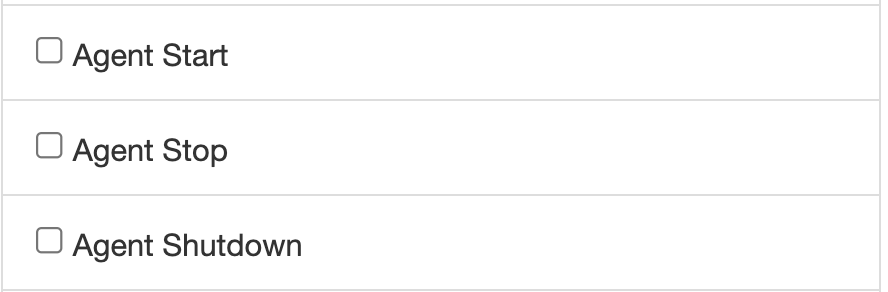
- Agent Start: Allow users with this role to start agents.
- Agent Stop: Allow users with this role to stop agents.
- Agent Shutdown: Allow users with this to shut down agents.
Workflows
All of the workflow permissions accept namespaces to narrow down the namespaces where a user with this role should have the selected permissions.
For example, a user with “View” permissions for the namespace “/MyNamespace” will be able to see any workflow under the namespace “/MyNamespace”, but will not be able to see any other workflows on the system.
Permissions granted on the root namespace (“/”) will apply to all workflows across the system.
These can also be mixed and matched – for example, a user might have “View” permissions for the namespace “/MyNamespace”, but only have “Pause” permissions for “/MyNamespace/SubNamespace”.
Finally, each permission can have multiple namespaces assigned. Just click the “+” icon to add an additional namespace for each permission.
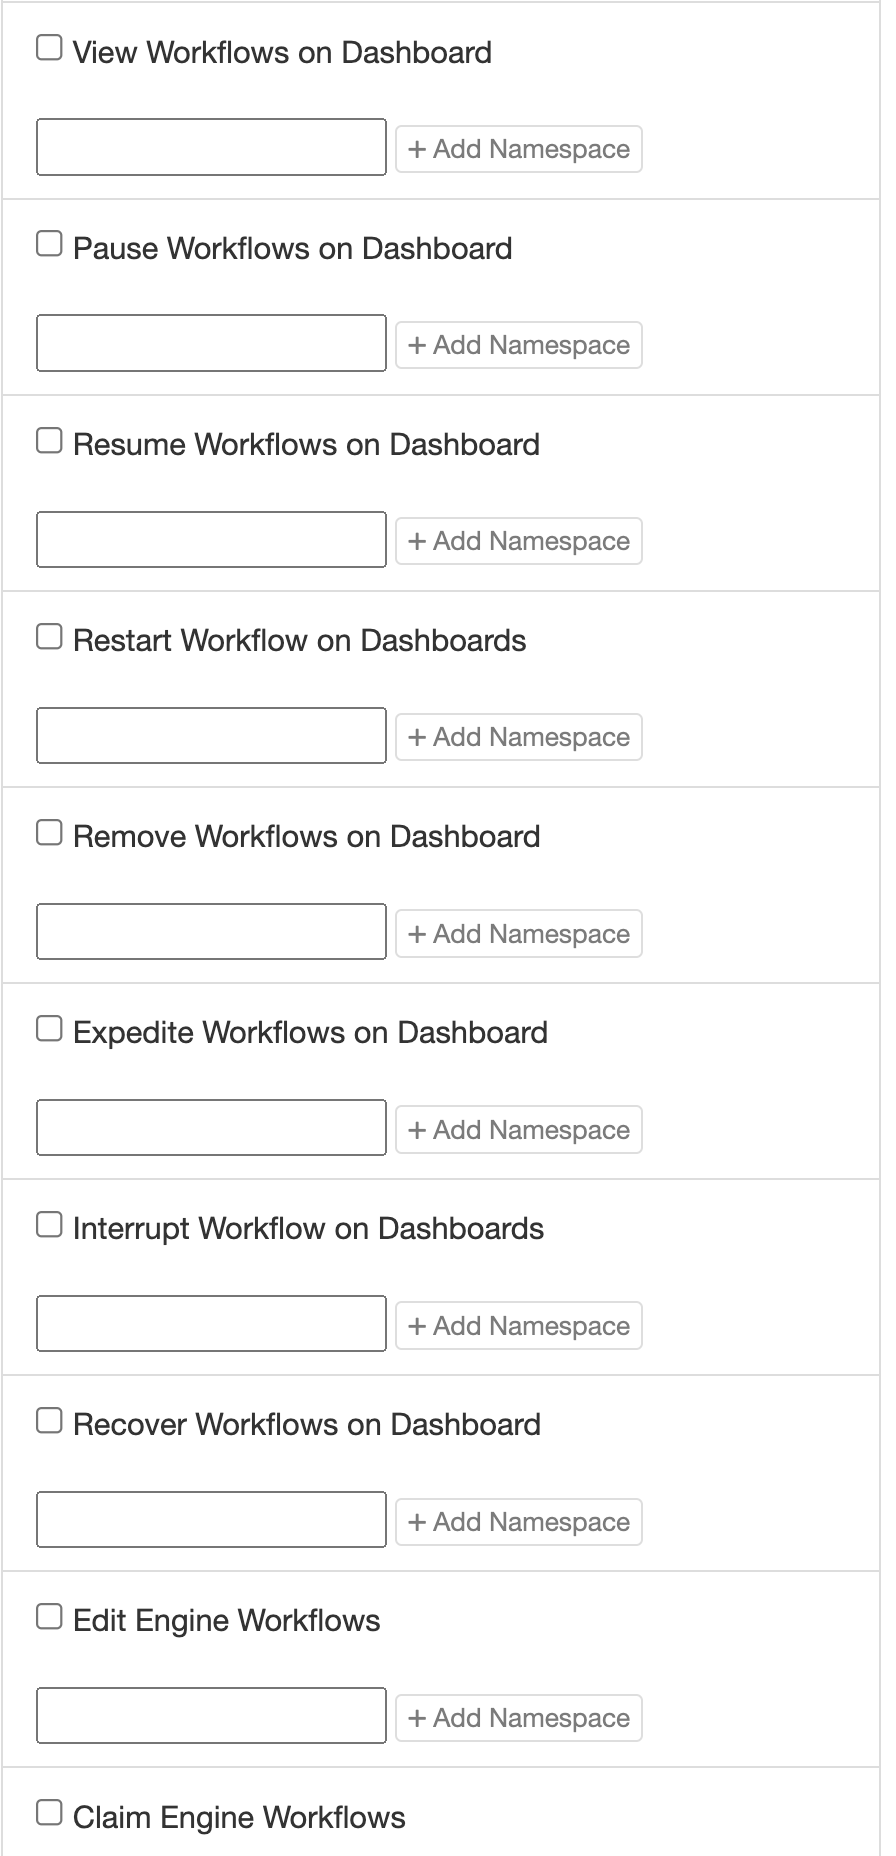
- View: Allow users with this role to see workflows in the specified namespaces.
- Pause: Allow users with this role to pause workflows in the specified namespaces.
- Resume: Allow users with this role to resume paused workflows in the specified namespaces.
- Restart: Allow users with this role to restart workflows in the specified namespaces.
- Remove: Allow users with this role to remove workflows in the specified namespaces.
- Expedite: Allow users with this role to expedite workflows in the specified namespaces.
- Interrupt: Allow users with this role to interrupt workflows in the specified namespaces.
- Recover: Allow users with this role to recover failed workflows in the specified namespaces.
- Edit: Allow users with this role to edit running workflow in the specified namespaces.
- Edit Variable: Allow users with this role to edit the specified variables for workflows in the specified namespaces. This permission allows you to restrict users to edit only a subset of variables in the larger overall workflow.
- Edit Action Variable: Allow users with this role to edit the specified variables for the given actions in the specified namespaces. This permission allows you to further narrow the scope of allowed editing by restricting users to only edit variables for a particular action within the workflows.
Repository
All of the repository permissions accept namespaces to narrow down the namespaces where a user with this role should have the selected permissions.
For example, a user with “View” permissions for the namespace “/MyNamespace” will be able to see any workflow stored in the repository under the namespace “/MyNamespace”, but will not be able to see any other workflows in the repository.
Permissions granted on the root namespace (“/”) will apply to all workflows in the repository.
These can also be mixed and matched – for example, a user might have “View” permissions for the namespace “/MyNamespace”, but only have “Remove” permissions for “/MyNamespace/SubNamespace”.
Finally, each permission can have multiple namespaces assigned. Just click the “+” icon to add an additional namespace for each permission.
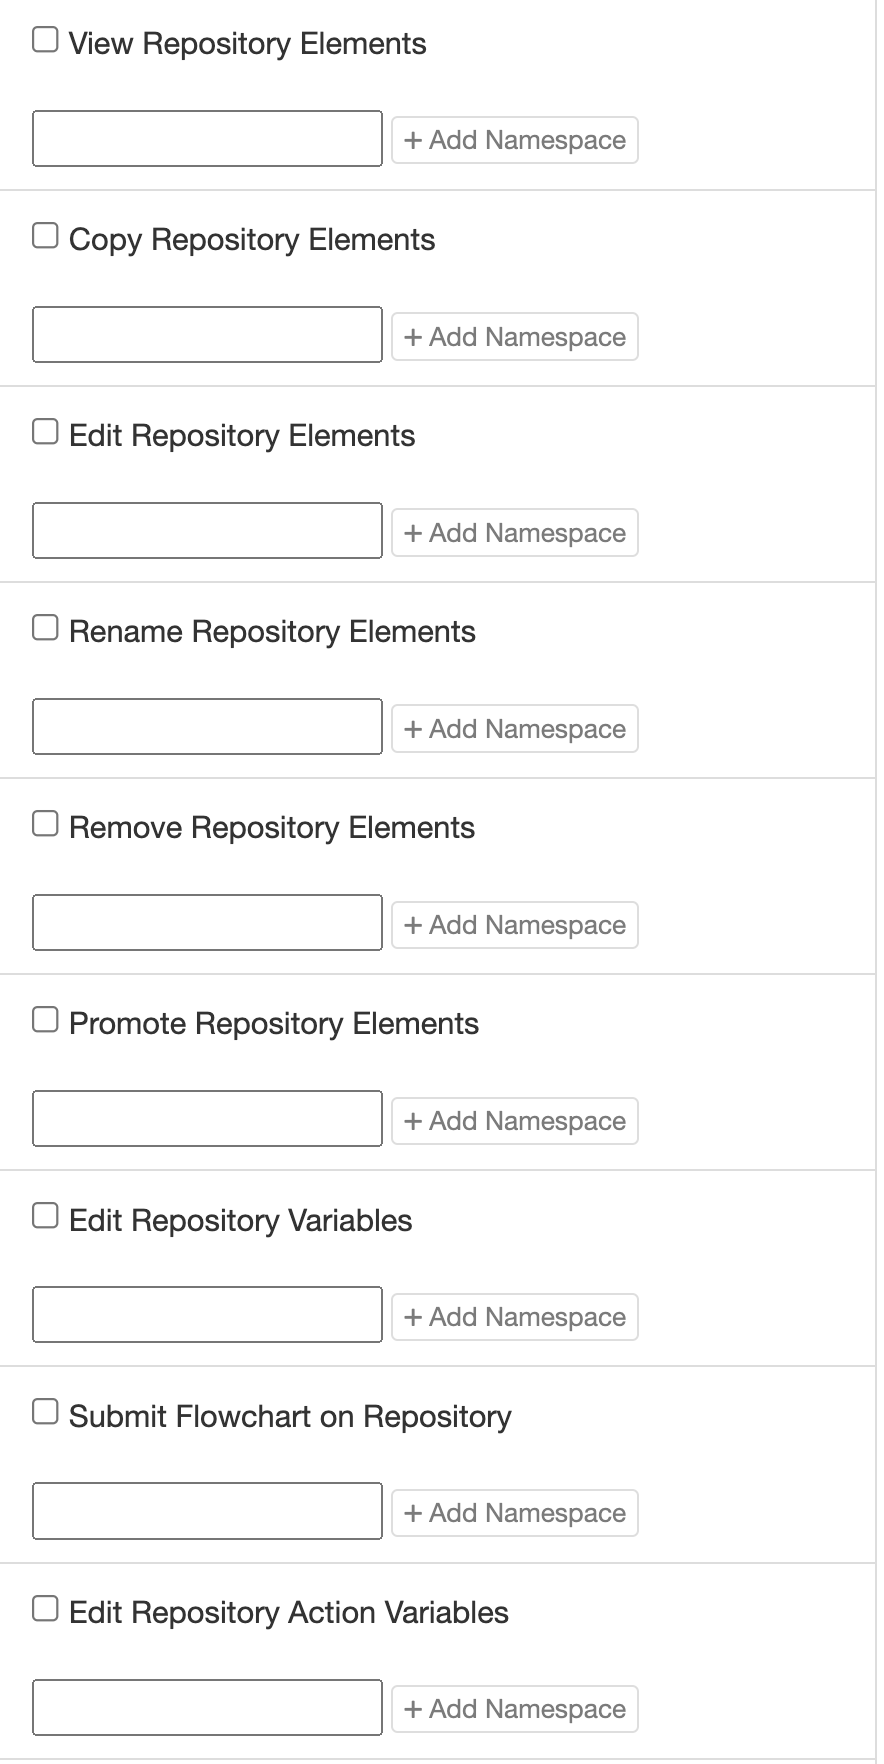
- View: Allow users with this role to view workflows or configurations stored in the repository under the specified namespaces. NOTE: to see workflows in the Operations Console, users will also need the “Show Repository workflows”, “Show Repository Engine Configuration”, and/or “Show Repository Agent Configurations” Operations Console permissions (depending on the type of repository.
- Copy: Allow users with this role to copy workflows or configurations stored in the repository under the specified namespaces.
- Edit: Allow users with this role to edit workflows or configurations stored in the repository under the specified namespaces.
- Rename: Allow users with this role to rename workflows or configurations stored in the repository under the specified namespaces.
- Remove: Allow users with this role to remove workflows or configurations stored in the repository under the specified namespaces.
- Promote: Allow users with this role to promote workflows stored in the repository under the specified namespaces. workflows can be promoted from the repository on this machine to a repository on another machine, allowing easy copying of workflows from one environment to another.
Reports
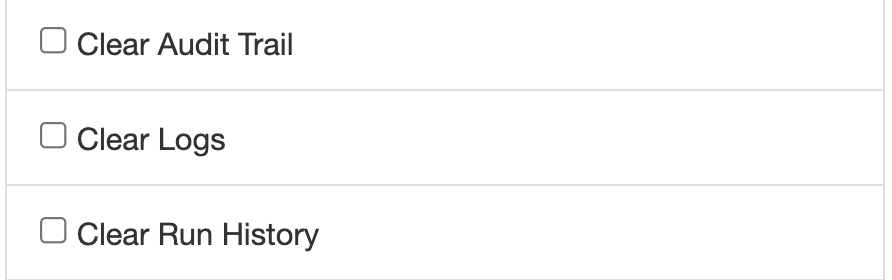
- Audit Trail Clear: Allow users with this role to delete all of the data in the Flux audit trail.
- Logs Clear: Allow users with this role to delete all of the logging data in the Flux database (this does not affect log files stored on the file system).
- Run History Clear: Allow users with this role to delete all run history data for previous workflow runs.
Operations Console
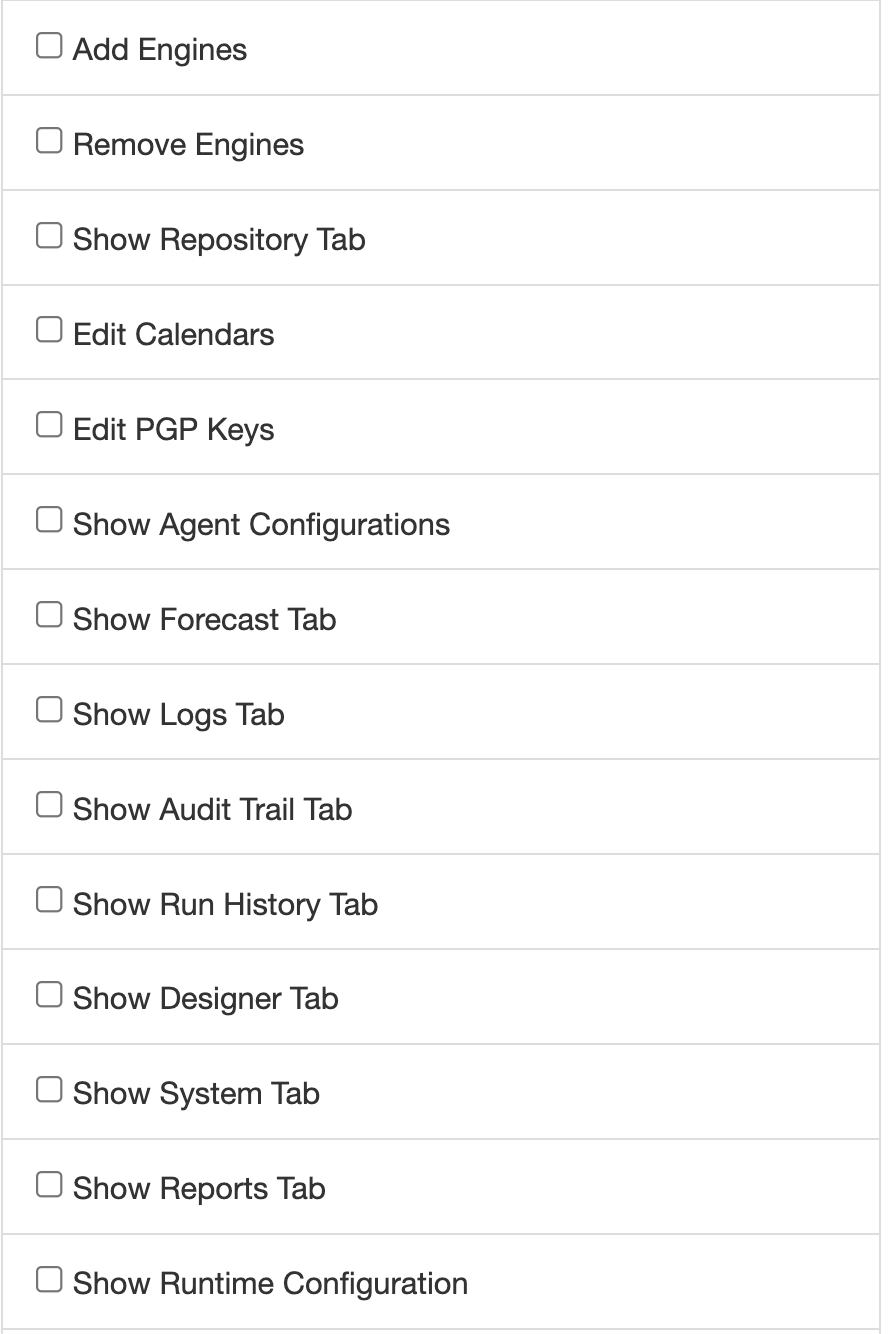
- Engine Add: Allow users with this role to connect to new engines from the Operations Console.
- Engine Remove: Allow users with this role to remove connected engines from the Operations Console.
- Show Repository workflows: Allow users with this role to see workflows stored in the repository (NOTE: users will also need Repository “View” permissions on the specific namespaces they should be allowed to see).
- Show Repository Engine Configurations: Allow users with this role to see engine configurations stored in the repository (NOTE: users will also need Repository “View” permissions on the root namespace, “/”, in order to see engine configurations).
- Show Repository Agent Configurations: Allow users with this role to see agent configurations stored in the repository (NOTE: users will also need Repository “View” permissions on the root namespace, “/”, in order to see agent configurations).
- Show Designer: Allow users with this role to access the Web-based Designer in the Operations Console.
- Show Forecast: Allow users with this role to access the Forecast page in the Operations Console.
- Show Reports Logs: Allow users with this role to access the Logs page under the Reports page in the Operations Console.
- Show Reports Audit Trail: Allow users with this role to access the Audit Trail page under the Reports page in the Operations Console.
- Show Reports Run History: Allow users with this role to access the Run History page under the Reports page in the Operations Console.
- Show Cognos: Allow users to view the Cognos page in the Operations Console.
- Show System: Allow users with this role to view the System page in the Operations Console.
Starting Workflows from the Repository
Because starting a workflow involves both interacting with the workflow in the repository and creating a new running version of the workflow, users will need a few permissions to start a workflow:
- View permission for the namespace in the Repository tab
- Edit permission for the namespace in the Repository tab
- Edit permission for the namespace in the Workflows tab
Keep this in mind when setting up permissions for users who will need to start repository workflows in addition to viewing / editing them.
LDAP Support
Flux can be configured to use an LDAP server for authentication and authorization. This is done in two steps: first, the Flux engine checks the supplied username and password against the LDAP server to make sure the credentials are correct. After that, the engine maps the user into a Flux role based on their LDAP group, which is used to assign permissions to the user.
When LDAP is enabled, all user login attempts are authenticated through LDAP rather than the Flux engine itself, except in the special case of the “admin” user. As a failsafe mechanism, the “admin” user will always attempt to authenticate using the normal Flux security mechanisms, so you can still log in using that account even after enabling LDAP (although any other accounts you created before enabling LDAP will fail to log in after LDAP is enabled).
Once LDAP has been enabled, you will no longer be able to manage Flux’s admin user login information (including changing this user’s password). If you need to change the password for this user, do so before enabling LDAP or, if you already have LDAP enabled, disable it, start the engine and Operations Console using the default security, go to the Security tab in the Operations Console, reset the admin user’s password, save and exit. You can re-enable LDAP security after shutting down both the engine and the Operations Console.
Configuring Flux to Use LDAP
To use LDAP with Flux, you’ll need to make a few changes to your engine configuration file to tell Flux where your LDAP server is connected, and how users and groups are stored on the server. LDAP properties are not available in the engine configuration editor in the Operation Console, so they must be set directly in the configuration file itself (this won’t prevent you from editing other properties in the editor, though – if you make any changes to the configuration from the Console, your LDAP properties will still be saved in the file after updating).
The first thing you’ll need to do is enable LDAP connectivity on the engine by setting:
Browsing your LDAP Users and Groups
The Flux configuration requires some information about the LDAP server in use, including DN locations of users and groups.
If you aren’t familiar with your LDAP server’s group/user locations, it is recommended to use one of the following applications to connect to your server and browse the directory tree:
- Apache Directory Studio (supports all LDAP servers, but recommended primarily for Apache DS)
-
ADSI Edit (recommended for Microsoft Active Directory)
LDAP_ENABLED=true
This instructs the engine that an LDAP server will be used for security authentication checks.
Next, you’ll need to add a few configuration options that tell Flux where your server is located, and how it can find users on the server. These options are:
- LDAP_HOST_URL: The URL (including hostname and port) where the LDAP server is located. Ex: ldap://myhost:10389/
- LDAP_BASE_DN: The base DN under which users are stored. Ex: ou=users,dc=flux
- LDAP_BIND_DN: The DN of the LDAP user account that should be used to look up users and groups on the LDAP server. Ex: cn=admin,ou=users,dc=flux. Note that this can be any DN – it does not specifically need to be located under the LDAP_BASE_DN, as long as it has permission to look up users in that location. This user is also not used to log in to Flux or to start the engine – it is exclusively used on the LDAP server for looking up other users and groups.
- LDAP_BIND_PASSWORD: The password for the user account specified by LDAP_BIND_DN. Ex: mypassword.
- LDAP_SEARCH_ATTRIBUTE: The attribute that contains the username token you want users to log in with to the Flux system. This can be any attribute on the LDAP users, like “uid”, “cn”, etc. When a user attempts to log in, Flux will check the LDAP server for any users with this attribute whose value matches the username that was provided. Ex: cn
When a user attempts to actually log in to the engine, it will perform the following process:
- Connect to the LDAP server at LDAP_HOST_URL.
- Bind to the server as the LDAP_BIND_DN, using the LDAP_BIND_PASSWORD.
- Given the username token supplied by the user who is attempting to log in, check any user objects under LDAP_BASE_DN with an LDAP_SEARCH_ATTRIBUTE whose value matches the login token.
- Check the password token supplied by the user against the password on the user object located in step 3.
- Search for groups that the user belongs to on the LDAP server.
There are two possible ways you can configure Flux to check for groups on the server.
The LdapLoginModule supports two modes for obtaining group information: “user search mode” and “group search mode”.
If your group information is stored as an attribute on the actual users in LDAP, you will want to use user search mode. In user search mode, Flux will check a specified attribute on the user for the groups that the user belongs to. If the user has multiple values for the specified attribute, Flux will use the first group it is able to find for that user.
On the other hand, if users do not have an attribute specifying which groups they belong to, you will need to use group search mode. In this mode, Flux searches for the group objects themselves directly on the server, then checks an attribute on the group object for the full DN of the user who is logging in. Flux will use the first group it can find with the given user as a member of that group.
To enable user search mode, just add the following to your engine configuration:
LDAP_USER_SEARCH_MODE_ENABLED=true
And for group search mode:
LDAP_USER_SEARCH_MODE_ENABLED=false
If this property is not set but you are using LDAP for security, Flux will use user search mode by default.
When search mode is enabled, the following engine configuration properties are available to specify how group information is stored on the user:
- LDAP_USER_GROUP_ATTRIBUTE: The name of the attribute on the user that stores the groups to which the user belongs. Ex: memberOf
- LDAP_USER_GROUP_ATTRIBUTE_IS_DN: Set this to true if the group attribute stores the full DN of the groups that the user is a member of. Set to false if the group attribute only stores the name of the group. Ex: true
- LDAP_GROUP_NAME_ATTRIBUTE_ID: If LDAP_USER_GROUP_ATTRIBUTE_IS_DN is set to true, this configuration property specifies the attribute on the group object itself that contains the group’s name. Flux will look up the group object at the given DN, then find the attribute with this name and use its value to assign the group name (used for permissions mapping – see below for more information). Ex: cn. This property does not need to be set if LDAP_USER_GROUP_ATTRIBUTE is set to false.
If group search mode is enabled, the following engine configuration properties are available to specify where groups are located on the LDAP server and how they store user information:
- LDAP_GROUP_BASE_DN: The base DN under which group objects are stored on the LDAP server. Ex: ou=groups,dc=flux
- LDAP_GROUP_MEMBER_ATTRIBUTE_ID: The name of the attribute on the group objects that determines which users belong to that group. This attribute’s value must contain the full DN of the user for Flux to correctly recognize the group. Ex: member
- LDAP_GROUP_NAME_ATTRIBUTE_ID: this configuration property specifies the attribute on the group object itself that contains the group’s name. Flux will use the attribute with this name to assign the group name (used for permissions mapping – see below for more information). Ex: cn
Once your engine is configured for either group search mode or user search mode, it is now ready to connect to and authenticate against your LDAP server. The engine configuration excerpts below provide some samples of typical LDAP configurations for both user and group search mode that you can use to get started:
User search mode:
LDAP_ENABLED=true
LDAP_HOST_URL=ldap://myldaphost:10389/
LDAP_BASE_DN=ou=users,dc=flux
LDAP_BIND_DN=cn=admin,ou=users,dc=flux
LDAP_BIND_PASSWORD=password
LDAP_SEARCH_ATTRIBUTE=cn
LDAP_USER_GROUP_ATTRIBUTE=memberOf
LDAP_USER_GROUP_ATTRIBUTE_IS_DN=true
LDAP_GROUP_NAME_ATTRIBUTE_ID=cn
Group search mode:
LDAP_ENABLED=true
LDAP_HOST_URL=ldap://myldaphost:10389/
LDAP_BASE_DN=ou=users,dc=flux
LDAP_BIND_DN=cn=admin,ou=users,dc=flux
LDAP_BIND_PASSWORD=password
LDAP_SEARCH_ATTRIBUTE=cn
LDAP_GROUP_BASE_DN=ou=groups,dc=flux
LDAP_GROUP_MEMBER_ATTRIBUTE_ID=member
LDAP_GROUP_NAME_ATTRIBUTE_ID=cn
Mapping Permissions when Using LDAP
Create Flux Roles before Mapping Permissions
To map permissions from LDAP to Flux, you’ll need to have some Flux roles created before starting the mapping. Before getting started on this step, first, create a few new roles (see above for more information) to cover the different permission settings you’ll want for your LDAP users.
If you’ve already configured the LDAP settings up to this point, don’t worry – you can still log in as the default “admin” user to Flux to set up your roles and permissions before moving on.
Now that your Flux engine is configured to authenticate users against the LDAP server, it needs some way to determine what permissions those users should have in Flux itself.
To do that, we’ll need to create a list of LDAP groups mapped to Flux roles. This will allow Flux to translate the LDAP group into a set of permissions that it can understand.
The LDAP group to Flux role mapping, like the LDAP configuration itself, is performed in the engine configuration. Each LDAP group you want to map will require two lines in the configuration – one with the name of the group from the LDAP server, and another with the name of an existing role on the Flux engine.
The actual syntax of the lines is:
LDAP_GROUP_TO_ROLE_MAP.<index>.group=<LDAP group name>
LDAP_GROUP_TO_ROLE_MAP.<same index>.role=<Flux role to assign>
One such pair should be included for each LDAP group you want to have permissions in Flux. You can have as many of these mapping set in the engine configuration as you need, as well – Flux doesn’t place any limit on the number of LDAP groups you can use.
Indexes start at 1, so the first mapping you include will have an index of 1, the second an index of 2, and so forth.
The following engine configuration excerpt shows a sample group to role mapping in Flux:
LDAP_GROUP_TO_ROLE_MAP.1.group=MyLDAPGroup
LDAP_GROUP_TO_ROLE_MAP.1.role=MyCustomFluxRoleA
LDAP_GROUP_TO_ROLE_MAP.2.group=Admin
LDAP_GROUP_TO_ROLE_MAP.2.role=Administrator
LDAP_GROUP_TO_ROLE_MAP.3.group=MyLDAPGroupB
LDAP_GROUP_TO_ROLE_MAP.3.role=MyCustomFluxRepositoryRole
That’s it! When an LDAP user in one of those groups logs in to the engine, they will be automatically assigned to the Flux role as dictated by the engine configuration.
A few items to keep in mind as well:
- The role mapping for a particular user is only done the first time the user logs in. This means that changing a user’s group in LDAP will not automatically update their corresponding role in Flux.
- If the role specified in the group to role map doesn’t exist in Flux when a user logs in, they will automatically be assigned the built-in workflow Master role instead. Make sure that the LDAP roles you are using have been created on the engine before you apply the group to the role map.